Showing posts with label Studio Calico. Show all posts

Birthday Wishes


Hi everyone and happy Thursday :)

Today, I am sharing a card, that was made for the Imagine Crafts Blog a few weeks ago!
I don't know why, but I totally forgot to post this here on my personal blog *eek*

But I think it's not too late to show it now ;-)

Therefore...here it is: A card made with the beautiful metallic "Encore" inks from Imagine Crafts/Tsukineko.
These inks are adorable - especially if you use them on dark background (will share a card using Encore inks on dark background, soon :) ). But they are alsoo adorable on light backgrounds! It's just a bit difficult to catch the wonderful metallic shimmer in a picture...

You can find the step-by-step instructions on the Imagine Crafts Blog!


The stamps on this card are from Whimsy Stamps and their "new" line of stamps "Clearly Whimsy Stamps" and the stamp set is called "Happy Everything"! It is designed by my dear online crafting friend Simonne Clay! She is so incredibly talented and I am a huge fan of her card creations for many years! I am super happy, that she now has her own beautiful designs made into clear stamps :)

Please refer to the grey box below this post for a complete list of supplies and visit the Imagine Crafts Blog for step-by-step instructions

Thanks so much for stopping by today and I hope to see you here on my blog again, soon :)

Sylvia xx


    Supplies


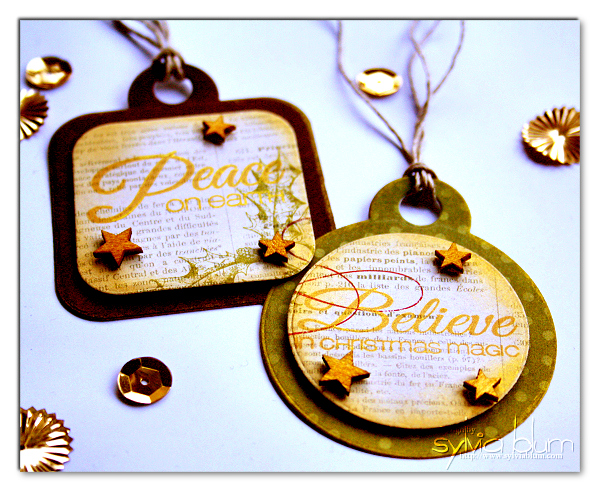
Tags for Christmas Presents


Hi everyone and happy 3rd Advent Sunday :)

Only 10 more days until Christmas... *phew*... time flies!

I couldn't sleep last night and woke up at 3:30 am *sigh* So I decided, not to let grass grow under my feet, but got creative *lol* (does this sound familiar to some of you?)
And I did some tags for our Christmas presents :-)
They are quite simple and quick to create, yet I love the look of them. Especially all the golden shimmer (I am such a sucker for all things shimmery and sparkly, and around Christmas, I especially love gold a lot ;-) )

So I went ahead and die cut left over scraps from a 6x6 paper pad by My Mind's Eye ("Lost and Found Christmas") and cut them with the "Funky Round Tag" and "Funky Square Tag" Fri-Dies from CAS-ual Fridays Stamps.

I stamped the sentiment (also from CAS-ual Fridays Stamp; from their "Christmas Carols" set) with Golden Glitz Delicata inks from Tsukineko. Oh my goodness.. how I loooove this beautiful, rich and sparkly golden ink! I just can't get enough of it. I even "colored" the small star wood veneers (Studio Calico) with the same Delicata ink, by using a sponge dauber and then dabbing the golden ink onto them. I also wiped around the edges of all patterned paper for a little bit of extra golden shimmer (did I tell you, that I am a huge fan of sparkle and shine? ;-) ).  I finished my tags with some rustic looking natural twine (to balance all of the gold).

I hope the recipients will love them as much as I do. And I hope you like them, too :)

Thanks so much for stopping by and I hope you will come back, visiting my blog soon! :)


ETA:
*** Thank You ***

    Supplies


"Bundle of Joy" Baby Card for CAS-ual Fridays #119


Hi everyone and happy Friday :)
Hallo zusammen und Euch allen einen wunderschönen Freitag :)
It's time for the next CAS-ual Fridays challenge *woot* and our theme for the next two weeks is
Es ist wieder Zeit für die nächste CAS-ual Fridays Challenge und das Thema der nächsten Woche lautet
The sponsor of this 119th challenge is
Ellen Hutson
Der Sponsor für diese 119te Challenge ist Ellen Hutson
Create a clean and simple project using embossing (heat or dry)
Zeigt uns ein clean and simple Projekt mit Embossing (egal ob dry oder heat embossing)
I embossed the background with a chevron folder, die cut the Fancy Round Tag Fri-Dies from white cardstock and added some twine + bling. The baby carriage (Lawn Fawn) was stamped with black Versafine ink onto a piece of patterned paper from Studio Calico's "Story Time" collection. I then cut it out trimming closely and added some highlights with a white gel pen.
I stamped the saying onto the same patterned paper and cut it into a little banner that I put on dimensional foam pads.
Ich habe den Hintergrund mit einem Chevron Folder embossed. Dann aus weißem Cardstock das runde Tag ausgestanzt mithilfe der Fancy Round Tag Fri-Dies. Dazu noch ein bisschen Twine und *bling bling* :-D
Den Kinderwagen (Lawn Fawn) habe ich mit schwarzem Versafine Kissen auf gemustertes Papier von Studio Calico ("Story Time" Serie) gestempelt und konturen genau ausgeschnitten. Dann noch ein paar Highlights mit weißem Gelstift hier und da gemalt. Der Spruch wurde auf dasselbe Papier gestempelt und dieses dann in Form eines kleinen Banner ausgeschnitten und mit 3D Pads befestigt.

For more inspiration from the talented Girl Fridays, please visit the CAS-ual Fridays blog!
Für weitere Inspiration von all den talentierten "Girl Fridays", besucht doch den CAS-ual Fridays Blog!

ETA
*** Thank You ***


    Supplies

    Challenges

Bundle of Joy Baby Card


Hi everyone and happy Sunday :)
Hallo zusammen und Euch allen einen wunderschönen Sonntag :)
This is my second post today and if you are looking for the Halloween tag card I made for Scrapbook Werkstatts inspirations gallery, please scroll down to the next post or click here.
Dies ist das zweite Posting am heutigen Tag und falls Ihr auf der Suche nach der Halloween Tag Karte seid, die ich für die Scrapbook Werkstatt Inspirations Gallerie gemacht habe, dann scrollt bitte nach unten oder klickt hier.
I usually don't post twice a day, but in this special case I cannot wait any longer to post this card I made today, because it is an entry for Seize the Sketch and the challenge is closing in a few hours ;-)
Normalerweise poste ich ja nicht zweimal an einem Tag, aber in diesem speziellen Fall blieb mir nichts anderes übrig, dann diese Karte ist für die Seize the Sketch Challenge und die endet in ein paar Stunden ;-)
This is the sketch they provide
Dies ist der bereitgestellte Sketch
I did not follow the sketch 100%, but it definitely was my inspiration. I changed a few things (like the rectangle going beneath instead of over the flag) and I addes some more elements. I am not sure it is eligible to be an entry for the challenge, although, but hope so :-)
Ich habe mich nicht 100%ig daran gehalten, aber es war definitiv der Ausgangspunkt für meine Karte! Ich habe ein paar Kleinigkeiten geändert (z.B. das große Rechteck unter das Banner, anstatt darüber) und ich habe ein paar Elemente hinzugefügt. Ich bin also nicht ganz sicher, ob das hier überhaupt ein "gültiger" Beitrag für die Challenge ist, aber ich hoffe es mal :-)
Wishing you all a wonderful rest of the weekend! Talk to you soon (Zva Creative DT Blog Hop for October is tomorrow! *hint hint* ;-) )
Ich wünsche Euch allen einen ganz wunderschönen Rest vom verbleibenden Wochenende! Ich hoffe Ihr besucht mich bald wieder (Morgen ist der Zva Creative DT Blog Hop für Oktober *mal mit dem Zaunpfahl wink*)

    Supplies

    Challenges

Dare to Get Dirty 2013


Hi everyone and happy Tuesday :)

It's THE time again: Dare to Get Dirty at Splitcoaststampers is in full swing and the Dirty Dozen and Dirty Dozen Alumni have a great time dareing the fan club members with awesome, creative and cool challenges! We also have a lot of fun chatter going on in the forums :)
If you aren't a fan club member yet and want to know more about the Dare to Get Dirty challenges, ***check this thread ***

Hallo zusammen und Euch allen einen wunderschönen Dienstag :)

Es ist wieder soweit: Splitcoaststampers' Dare to Get Dirty ist in vollem Gange und die Mitglieder des Dirty Dozen und die Dirty Dozen Alumni haben jede Menge super toller, kreativer und cooler Challenges für Euch vorbereitet!  Außerdem haben wir eine Menge Spaß im DTGD Forum :)
Falls Du noch kein Fan Club Mitglied bist, aber gerne mehr über die Dare to Get Dirty Challenges wissen möchtest *** lese diesen Thread ***

But wait, there is more! 
We also have 10 wonderful sponsors who donate great prizes during the challenges:
Aber halt, das ist noch nicht alles!
Wir haben außerdem 10 super tolle Sponsoren, die jede Menge super tolle Preise bereitstellen:


And I am super excited to be the hostess of one of the 40+ challenges, today *woot woot*
Above you can see the sample card I made for my challenge. Can you guess what the challenge theme is? No? Then hop on over to the forums and you can read all about it ***here***
And you can find all entries for my challenge in the gallery ***here***

Und ich freu mich totaaaal und bin auch schon ganz aufgeregt, weil ich heute dran bin und Euch eine der über 40 Challenges präsentiere *juhuuuu*

Die Karte oben ist meine Beispielkarte für die Challenge. Könnt Ihr erraten, was die Herausforderung sein könnte? Nein? Dann ab ins Forum, denn dort könnt Ihr es nachlesen: ***hier***
Und alle Beiträge zu meiner Challenge findet Ihr in der Galerie ***hier*** 

The challenges are for fan club members only! So if you aren't a fan club member yet, why not become one?! It's well worth the little mite you have to pay for this exclusive membership!!!


Die Dare to Get Dirty Challenges sind exklusiv nur für Fan Club Mitglieder! Also falls Du noch kein Mitglied bist, warum nicht jetzt beitreten?! Es ist den kleinen Obulus, der dafür zu entrichten ist, wirklich wert!!!

I hope you will join me in my challenge and cannot wait to see your entries!
Ich hoffe Ihr macht mit bei meiner Challenge und ich kann es kaum erwarten Eure Beiträge zu sehen!


challenges:
Splitcoaststampers Dare to Get Dirty DTGD13~Fee~
Paper Smooches SPARKS: Anything Goes


    Supplies


Follow me:
follow me on bloglovin' get updates via email
~°~ Thanks for visiting my blog ~°~
Sylvia

Just a Note


Hi everyone and happy Sunday :)
Today I'm sharing a sunny card with you that I made with supplies that come with the brand new Scrapbook Werkstatt July Kit (available as of June 26th) and one of the additional paper kits!
The sentiment is from a stamp set by Whimsy Stamps, inks are from Hero Arts and the label die is from Spellbinders.

Hallo zusammen und Euch allen einen wunderschönen Sonntag :)
Heute möchte ich Euch eine sonnige Karte zeigen, die ich mit den Materialien aus dem brandneuen Juli Kit der Scrapbook Werkstatt (erhältlich ab dem 26. Juni), sowie einem der zusätzlichen Papierkits gemacht habe!
Der Spruch ist ein Stempel aus einem Whimsy Stamps Set, Stempelfarbe ist von Hero Arts und die Stanze ist von Spellbinders.

And here's a sneak peek of the cards made with the Scrapbook Werkstatt July Kit, that I will show you during the next days here on my blog :)

Und hier ist noch eine Vorschau auf die Karten, die ich mit dem Juli Kit der Scrapbook Werkstatt gemacht habe, die ich Euch dann in den nächsten Tagen nach und nach hier auf meinem Blog zeigen werde :)
card recipe:

*** cardstock stickers, star wood veneers are part of Scrapbook Werkstatt's July kit ***
*** patterned paper is part of Scrapbook Werkstatt's additional July paper kit ***
*** July kits available on June 26th ***


*** Reminder ***

Google Reader will be stopped as of July 1st!

If you want to get updates from my blog furthermore, please follow my blog on Bloglovin' (click on button below)
Follow on Bloglovin
 
or
subscribe via EMail (click on button below)


Want to know how to import your RSS feed from Google Reader to Bloglovin'?
Click HERE
~°~ Thanks for visiting my blog ~°~
Sylvia

CAS-ual Fridays - Over The Edge

 
Hi everyone and happy Friday :)
It's Friday *hooray* and this means a new 
CAS-ual Fridays challenge is starting, today!
This week our theme is

Hallo zusammen und Euch allen einen wunderschönen Freitag :)
Es ist Freitag *Hurra* und so gibt es auch heute wieder eine neue CAS-ual Fridays Challenge!
Das Thema dieser Woche lautet 
 
create a CAS project with panels or elements that go off the edge of your project
erstellt ein CAS Projekt mit Teilen oder Elementen die über Euer Projekts hinaus ragen
 
 
This weeks sponsor is CAS-ual Fridays Stamps
Der Sponsor in dieser Woche ist CAS-ual Fridays Stamps
 
 
For my card I stamped the "Truth is..." sentiment from the CAS-ual Fridays Stamps "Truth Is" set in pink onto a small rectangle and then rounded the upper corners to create a little tab.
I then repeatedly stamped the flowers from CAS-ual Fridays Stamps "Loving Thoughts" in yellow onto the card base and the sentiment in pink onto the lower right corner.
I then created a paper panel from two patterned papers that came with Scrapbook Werkstatt's June Kit, put this on pop dots and randomly adhered some pink sequins.
 
Für meine Karte habe ich das "Truth Is..." Sprüchlein vom CAS-ual Fridays Stamp Set "Truth Is" in pink auf ein kleines Rechteck gestempelt und habe dann die oberen Ecken abgerundet, so das ein kleiner Tab Reiter entstanden ist.
Dann habe ich Blümchen aus dem CAS-ual Fridays Stamps set "Loving Thoughts" in gelb mehrmals auf die Karte gestempelt und nochmal den großen Spruch in pink unten rechts.
Dann habe ich einen Papierstreifen aus zwei verschiedenen gemusterten Papieren gemacht, die aus dem Juni Kit der Scrapbook Werkstatt stammten und hab die dann auf 3D Pads gesetzt. Noch ein paar pinkfarbene Pailletten und das war's.
 
To see what the super talented ladies from the CAS-ual Fridays design team came up with and to link up your projects, please visit the CAS-ual Fridays challenge blog  :)

Noch mehr Inspiration vom wirklich genialen CAS-ual Fridays Design Team und um Eure Werke zu verlinken, besucht bitte den CAS-ual Fridays challenge blog  :)

 
card recipe:

challenges:

*** Reminder ***

Google Reader will be stopped as of July 1st!

If you want to get updates from my blog furthermore, please follow my blog on Bloglovin' (click on button below)
Follow on Bloglovin
 
or
subscribe via EMail (click on button below)
 
 
Want to know how to import your RSS feed from Google Reader to Bloglovin'?
Click HERE


~°~ Thanks for visiting my blog ~°~
Sylvia

How To: Create a Pinwheel Birthday Card


Hi everyone and happy Wednesday!
Today I'm sharing a CAS Birthday card with you where I used one of the beautiful papers that came with the Scrapbook Werkstatt June Kit!
To create the cute pinwheel on the card I used a soft and pastel colored patterned paper from Studio Calico's "Atlantic" collection.

I also have a (english) step-by-step video for you, where I show how I made this card.
And I am also sharing some little tips and tricks along the way :)
I hope you like it!


*** You can also view the Video directly on YouTube ***

Hallo zusammen und Euch allen einen wunderschönen Mittwoch :)
Heute möchte ich Euch eine CAS (clean and simple) Geburtstagskarte zeigen, die ich mit einem der hübschen Papiere aus dem Scrapbook Werkstatt Juni Kit "Seemannsgarn" gewerkelt habe!
Ich habe ein sehr pastelliges Papier aus Studio Calico's "Atlantic" Serie für mein kleines Windrädchen auf der Geburtstagskarte verwendet.

Ich habe außerdem auch ein (deutschsprachiges) Schritt-für-Schritt Video für Euch, in dem ich den Entstehungsprozess dieser Karte zeige und auch einige Tipps und Tricks verrate :)
Ich hoffe es gefällt Euch!


*** Das Video könnt Ihr auch direkt auf YouTube anschauen ***

detail shots / Detailaufnahmen:


My crafting friend Baerbel Born recently also shared a picture tutorial on how to create a pinwheel for your garden, you can check it out HERE
Meine Bastel-Freundin Bärbel Born hat kürzlich ebenfalls eine bebilderte Anleitung für ein Garten-Windrädchen gepostet. Ihr findet es HIER.

card recipe:

*** patterned papers and cork stickers are content of  ***
*** Scrapbook Werkstatt's June Kit "Seemansgarn" ***

~°~ Thanks for visiting my blog ~°~
Sylvia

Gatefold Card "Hello"


Hi everyone and happy Monday :)
And Happy Memorial Day for my friends in the United States!

Today I want to share a special fold card with you - a gatefold card.
It's actually a very easy to create card and I am planning to make a little step-by-step tutorial for everyone interested in the near future.
ETA: You can find the tutorial ***HERE***
So if you are interested in learning how to create this card, please come back soon and hopefully the instructions will be here ;-)
I used patterned papers, alphabet stickers and a cork sticker from the brand new Scrapbook Werkstatt June Kit, that is available in the store as of today! :)

Hallo zusammen und Euch allen einen wunderschönen Montag :)
Heute möchte ich Euch eine speziell gefaltete Karte zeigen - nämlich eine sogenannte "Gatefold" Karte. Gate, bedeutet "Tor" und genau so ist die Karte auch gefaltet. Sie hat zwei "Torflügel", die man öffnen kann, sobald die Banderole entfernt ist.
Tatsächlich ist die Karte recht einfach zu gestalten und ich habe vor, demnächst für alle Interessierten ein kleines Schritt-für-Schritt Tutorial dafür zu erstellen.
ETA: Das Tutorial findet Ihr ***HIER***
Wenn Ihr also wissen möchtet, wie man so eine Karte macht, dann kommt einfach bald wieder vorbei ;-)
Für die Karte habe ich Papier, Alpha Sticker und Kork Sticker aus dem brandneuen Scrapbook Werkstatt Juni Kit "Seemannsgarn" verarbeitet, welches ab heute im Shop erhältlich ist! :)


closed / geschlossen:
 
top view / von oben:

open / geöffnet:


card recipe:
*** patterned papers and cork stickers are content of  ***

challenges:
 
~°~ Thanks for visiting my blog ~°~
Sylvia