Hi everyone and happy Monday :)
Welcome to a week of fantastic collaboration between IMAGINE Crafts and Magenta Rubber Stamps! Both companies are excited to share with you their products, from the latest inks from IMAGINE Crafts to the newest Fall and Holiday stamp releases from Magenta.
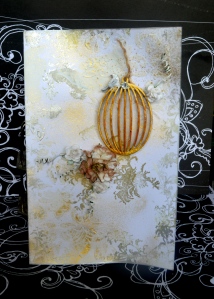
And here is my project:

Supplies:
|
Instructions:
Stamp the Magenta "Noel" image with Versamark ink on a plain white panel of cardstock and heat emboss it with Imagine Crafts white embossing powder.
Pick up some Memento inks in Love Letter with an Ink Blusher tool and also some Memento inks in Tangelo and colore the card front.
Move right over the entire area, even over the embossed image. The embossed lines act like a resist and will not get colored.
You can go over the embossed lines with a damp cloth in the end if you want to.

"Distress" - or I better should say: color all edges of the panel with Delicata Golden Glitz ink and a Sponge Dauber.

Pick up some Delicata Golden Glitz ink with a Fanastix brush and color in the star and the bell.

Use Memento markers in Tangelo to color the inside potions of the embossed "Noel" letters. Then use the Rhubarb Stalk marker to create some shading.

A Memento marker in Dandelion was used to color the swirls and all of the lighter areas in the embossed image and also to highlight the letters on the outside, to let them stand out against the red background a little better.
The potions on the image that should be white (like the braid of the hat and the melting wax on the candle), will be filled in with the irRESISTible Pico Embellisher in Wedding Dress.

To create the faux stitched border, use a ruler as a guide and poke wholes all around the panel. Then use the irRESISTible Pico Embellisher in Wedding Dress (white) again to create the "stitches".

Cut a length of neutral (off-white) seam binding and dye it with Memento Luxe inks in Tangelo and Dandelion and the help of an Ink Blusher tool.
Heat set it with a heat tool and let it cool, before wrapping it around the card and tieing into a bow.

Almost done... just add some enamel dots here and there and mount the layer onto the card front with foam tape.
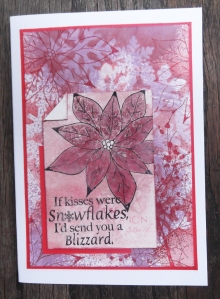
And here is an additional close up to show you the faux stitching and some of the other details :)

(*click* on the picture for a scaled up image)
Prizes galore for participating in the Blog Hop this week!
IMAGINE Crafts and Magenta are offering a total of three different prizes this week as part of this Blog Hop. These prizes include IMAGINE Crafts' irRESISTible Texture Spray, irRESISTible Pico Embellisher, Delicata Shimmery Silver and Golden Glitz AND some of the newest releases from Magenta. Take a moment to visit the other featured artists' blogs listed below and leave a comment on their posts by midnight PST September 21st. Three winners will be randomly selected from three different blogs from the seven days of the Hop, with one commenter from each blog draw as the winner.Presenting the other featured projects for today:
Kazuko Kocho
Agnieszka Bellaidea

Dianne Johnson

Josée Gingras
Bianca van Noort
Blog Hop Hint – if you click on a link that takes you to a page saying something like, “Sorry this page cannot be found,” just click on the header at the top of the blog (usually a picture, or the blog’s name), and it will take you to that blog’s most recent post. That post *should* be our hop. If not, you can probably scroll down a short way to find the hop post.
Thanks so much for stopping by today and I hope to see you here on my blog again, soon :)
Sylvia xx
Challenges
|
Love the colors you used!! Gorgeous stamp too. I like how you colored the seam binding.
ReplyDeleteLove the colors! Great card!
ReplyDeleteVery pretty and I love
ReplyDeleteall the techniques you
used on it!
Carla from Utah
Beautiful card. Wonderful colors. The inspiration to use different colors is great.
ReplyDeletePunching holes around the edges and using the Pico Embellisher to simulate the stitches is genius! I've always admired cards with some stitching and now I know how to make the same look without dragging out the sewing machine. Thanks Sylvia for sharing that wonderful technique. I passed up that stamp and now I'm going to have to order it!
ReplyDeleteI am speechless! How beautiful! The background and the faux stitching are my favorite parts! TFS!
ReplyDeleteGreat way to make those stitches with the irresistible pen, love the texture you can create with it!
ReplyDeleteBeautiful colors on this lovely card! I love the pretty stamp you used, and how beautifully the Memento ink colors blend! The edge "stitching" makes a fabulous frame!
ReplyDeleteGreat colours and love the stamp. Thanks for sharing.
ReplyDeleteBeautiful card! Love the technique and gorgeous colours!
ReplyDeleteAbsolutely beautiful, love the technique!
ReplyDeleteSylvia, your project is amazing!! I am so glad I stopped here :)
ReplyDeleteVery happy Christmas card... I love it!
ReplyDeleteThat is so pretty, I love the non-traditional colors, very eye catching.
ReplyDeleteGolden glitz ink and wedding dress pico embellisher just went on my shopping list.
ReplyDeleteBeautiful card! I love the perfect faux stitching, and your colors are gorgeous!
ReplyDeleteLove those colors!
ReplyDeleteLove the rich and intense colors, Sylvia! What a BEAUTY that you created! I love the step by step photos as well. Thanks so much for playing Simon Says Stamp Wednesday Create Your Own Background Challenge!
ReplyDeleteWhat an awesome card. I was amazed that it was faux stitching. It looks so real. The colors are awesome and I love how you heat embossed the candles, colored them in and then added the fur and melted was. You have gotten me very interested in that irResistible pen. Superb job.
ReplyDeleteBeautiful - I love the colors!
ReplyDeleteAmazing Christmas card, love how you added the details.
ReplyDeleteThank you for joining us at Simon says Stamp Wednesday Challenge.
Luv
Debby
Love the colours and the Stamp you have used..
ReplyDeleteHugs
Son Ja
A amazing card
ReplyDeleteOh, Sylvia, this is a gorgeous card! I love your technique and the beautiful results!! Stunning! So glad you've joined us for the ODBD Shining the Light challenge for the stitching theme! Hugs!
ReplyDeleteI love the color ! it's different and verry nice !
ReplyDeleteWow stunning card!!! Love the rich, warm colours; and that faux stitich looks fabulous!!
ReplyDeleteReminds me of our Australian Outback with rich ochre colours
ReplyDeleteGORGEOUS card Sylvia!!!
ReplyDeleteLOVE the rich oranges & reds with the golden shimmer - a DELICIOUS non-traditional combo for Christmas!!!
LOVE the BEAUTIFUL sentiment stamp and AMAZING faux stitching too!!!
THANK YOU for sharing your CREATIVE INSPIRATION :)
This is stunning!!!! I LOVE the colors that you used on your card.
ReplyDeleteWhat gorgeous colours and design. Love it - love it. Hope to see you back here again soon. Thank you for joining us at Holly Jolly this week. Judy DT
ReplyDeleteStunning card. I love this gorgeous rich ochre look to the blended ink and the gold.
ReplyDeleteThis is stunning Sylvia!! I just love the colors, your embossing, and the faux stitching!! :Your faux stitching looks real!! Thanks for sharing it with us at ODBD!!
ReplyDeletehugs,
Chris
This is beautiful! I love the inked background and how the gold changes it and adds to it. Also love the embellisher, the stitches look real! Beautiful card. Thanks for sharing.
ReplyDeleteKatie B.