Showing posts with label Easter. Show all posts

Hoppy Easter Card


Hi everyone and happy Saturday :)

Just a quick post today to share an Easter card with you. To create this card, I followed sketch #61 at CAS(E) this Sketch! 


You can find the step-by-step instructions below in the "Instructions" box and below there is a detailed list of supplies I've used.


ETA:

*** Thank You ***


Thanks so much for stopping by today and I hope to see you here on my blog again, soon :)

Sylvia xx


    Instructions
  • make 4 1/4" x 5 1/2" card base from 4 1/4" x 11" white cardstock and round lower corners
  • cut 3" x 3 1/2" rectangle of yellow patterned paper
  • cut 3" x 3/4" strip of white cardstock and create a decorative border by using a bracket border punch 
  • adhere punched strip to lower edge of yellow paper panel
  • stamp bunny with Memento Tuxedo Black onto a scrap piece of white cardstock and color with  Memento Desert Sands + Angel Pink markers
  • cut out colored bunny, trimming closely
  • stamp Easter greetings with Memento Tuxedo Black onto yellow paper panel
  • double wrap a length of rose bakers twine around the panel and tie into bow
  • embellish  bow with rose glitter rhinestone
  • adhere cut out bunny  to yellow paper panel using foam pads
  • mount yellow paper panel to card base using foam pads


    Supplies
  • stamps - Paper Smooches: Magical Spring
  • coloring medium - IMAGINE Crafts/Tsukineko Memento markers: Desert Sand, Angel Pink
  • inks - IMAGINE Crafts/Tsukineko Memento: Tuxedo Black
  • patterned papers - My Mind's Eye: Collectable Notable 6x6 paper pad
  • tools - WRMK Corner Chomper, Fiskars bracket border punch
  • others - white cardstock, rose bakers twine, Queen+Co Goosebumps rose, dimensional foam pads


    Challenges


Hoppy Easter


Hi everyone and happy Saturday :)
Today I'm sharing an Easter tag with you, that was mostly done with my Silhouette machine.
I just love this tool and would not want to miss it anymore! I don't use it too often, but think I should make more use of it in future, because the possibilities seem to be endless :)
The base of my tag is a patterned paper from Carta Bella's "Devoted" collection.
The white cardstock is from American Crafts! I just love AC cardstock the most for using it with my Silhouette machine. There may be other cardstocks that will work well with it, too. But this one is my personal favorite. I cut out one cloud from the tag and put the cloud on foam dots again - not sure you can properly see it in the picture?  The small hearts are punched out and the "Hoppy Easter" sentiment is a stamp from a Paper Smooches stamp set. I put almost everything on dimensional foam adhesive for a little bit more interest. The tag base itself was ink distressed using some "Broken China" Distress inks and then I did my beloved faux stitching all around the edges.


Hallo zusammen und Euch allen einen wunderschönen Samstag :)
Heute möchte ich Euch ein Oster-Tag zeigen, das zum größten Teil mit der Silhouette Maschine gemacht wurde. Ich liebe dieses Maschinchen einfach und möchte es nicht mehr missen! Ich benutze sie zwar nicht allzu häufig, aber ich denke ich werde sie mir in Zukunft vielleicht doch häufiger zunutze machen, denn die Möglichkeiten damit scheinen quasi endlos zu sein :)
Die Basis meines Tags ist ein gemustertes Papier aus der Carta Bella "Devoted" Serie. Der weiße Cardstock ist von American Crafts! AC Cardstock ist mein bevorzugter Cardstock um ihn mit der Silhouette zu benutzen. Ganz bestimmt gibt es auch noch andere Marken mit denen das alles prima funktioniert, aber mein persönlicher Favorit sind eben die Cardstocks von AC wenn ich etwas mit der Silhouette schneiden möchte. Ich habe eine Wolke aus dem Tag ausgeschnitten, dies dann mit weißem Cardstock hinterlegt und danach die ausgeschnittene Wolke etwas versetzt mit 3D Pads wieder aufgesetzt. Weiß nicht ob man das auf dem Foto gut erkennen kann? Die kleinen Herzen sind mit einem Handstanzer ausgestanzt und das "Hoppy Easter" Sprüchlein ist aus einem Stempel Set von Paper Smooches. Ich habe eigentlich beinahe alles auf 3D Pads gesetzt, damit das Ganze etwas plastischer und interessanter wird. 
Das Tag selbst habe ich mit "Broken China" Distress inks gewischt und dann hab' ich mal wieder meine geliebte falschen Nähte ringsum gemacht.

Ok, enough babbled ;-) 
Wishing you all a wonderful Easter weekend!!!

Ok, genug gequasselt ;-)
Ich wünsche Euch allen einen wunderschönes Osterwochenende!!! 


tag recipe:
  • stamps - Paper Smooches "A Magical Spring"
  • patterned papers - Carta Bella "Devoted - "Adored Tickets"
  • tools - Silhouette SD electronic cutting machine
  • cutting files - Lori Whitlock "5 clouds", Sarah Hurley "Bunny Scene Silhouette"
  • others - American Crafts white cardstock, EKSuccess small heart punch, pewter rhinestone, brown baker's twine, Hero Arts inks "Latte", dimensional foam adhesive
~°~ Thanks for visiting my blog ~°~
Sylvia

CAS-ual Fridays - Easter Projects (no cards)

Hi everyone and happy Friday :)
Welcome to another CAS-ual Fridays challenge! The challenge theme this week is:


  Hallo zusammen und Euch allen einen wunderschönen Freitag :)
 Willkommen zu unserer neuen CAS-ual Fridays Challenge! Die Herausforderung dieser Woche lautet:


 Create a clean and simple Easter project - but with a special twist: It must be anything BUT a card!
Zeigt uns ein "clean and simple" Osterprojekt - allerdings mit einer speziellen Anforderung: Es soll KEINE Karte sein!

There are also some wonderful news to share: We will have a new Girl Friday joining the team as of April: it is the brilliant Jocelyn Olson!
Es gibt außerdem noch ein paar wundervolle Neuigkeiten: ein neues Girl Friday wird nämlich ab April das Team verstärken: es ist die geniale Jocelyn Olson!

  This week our sponsor is Timeless Twine and the winner will receive a prize package from the sponsor!   
Der Sponsor dieser Woche ist Timeless Twine und der/die GewinnerIn wird ein Gewinn-Paket vom Sponsor erhalten!


For my project I die cut a lacey banner (Spellbinders) from kraft cardstock, then cut out a triangle of patterned paper (Bo Bunny).
The Easter image is a digi from Whimsy Stamps and I colored it with Tombow markers.
I would be really happy if you decide to play along with us! To see what the super talented ladies from the CAS-ual Fridays design team came up with and to link up your projects, please visit the CAS-ual Fridays challenge blog  :)

Für mein Projekt habe ich ein Banner aus Kraft Cardstock ausgestanzt (Stanze von Spellbinders) und ein passendes Dreieck aus gemustertem Papier (Bo Bunny) ausgeschnitten. Das Ostermotiv ist ein Digi von Whimsy Stamps, das ich mit Tombow Stiften koloriert habe.

Für noch mehr Inspiration vom wirklich genialen CAS-ual Fridays Design Team und um Eure Werke zu verlinken, besucht bitte den CAS-ual Fridays challenge blog  :)


banner recipe:
challenges:

~°~ Thanks for visiting my blog ~°~
Sylvia

Easter Card

 
Hi everyone and happy Saturday :)
Today I'm sharing an Easter Card made with the lovely patterned papers from Bo Bunny's "Prairie Chic" collection.
I truly adore this collection! I know I have said this before, but  have to repeat it: I'm in love with the patterns and colors!!!
And with some additional stamps (these are from a German manufacutrer and the saying "Frohe Ostern" is "Happy Easter" in English) these lovely and versatile papers -that aren't intended for Easter projects originally- are absolutely perfect for an easy shabby Easter card ;-)

Hallo zusammen und Euch allen einen wunderschönen Samstag :)
Heute möchte ich Euch eine Oster Karte zeigen, die ich mit den wundervollen Papieren aus Bo Bunny's "Prairie Chic" Serie gewerkelt habe! Ich finde diese Serie einfach wundervoll! Ich weiß ich hab's schonmal erwähnt, aber ich muss mich wiederholen: Ich LIEBE die Dessins und Farben wirklich sehr!!!
Und mit ein paar zusätzlichen Stempelchen (diese hier sind von der Scrapbook-Werkstatt) werden die hübschen Papierchen, die zwar ursprünglich nicht für Ostern gedacht waren, dennoch perfekt passend gemacht für eine einfache Oster Karte ;-) 


Oh... und übrigens... diese Karte ist nach (m)einem Sketch entstanden, den ihr im Oster-Aktions-Forum der Scrapbook-Werkstatt finden könnt! HIER kommt Ihr direkt zum Thread mit meinem Karten-Sketch und HIER zum Oster-Aktions-Forum generell, so es noch viele weitere tolle Inspirationen, Rezepte, Sketche etc. zu finden gibt!


card recipe:

challenges: 
 
 ~°~ Thanks for visiting my blog ~°~
Sylvia

Easter Card w/tutorial

Hi everyone and happy Monday :)
We at the Scrapbook Werkstatt forums have lots of fun ideas und tutorials to share with you during this week :)
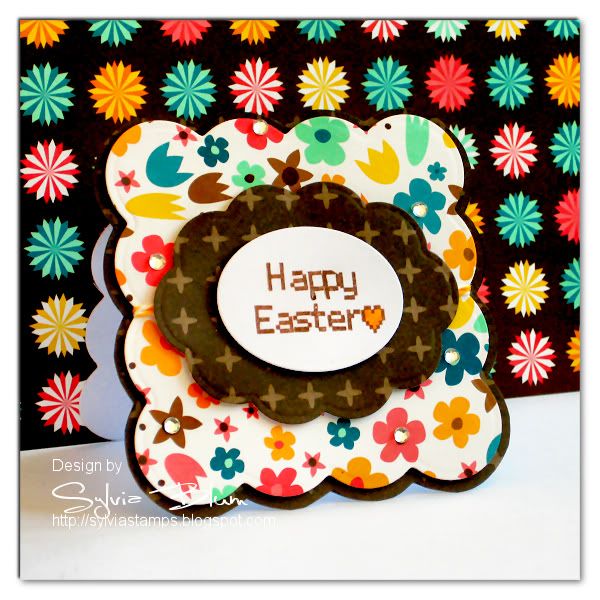
I made this little tutorial to show you how to create a quick and simple Easter card!
This card is so easy to create, you really can do it 'last minute' or -if you use another sentiment- it's great for mass production, like creating invitations for your next summer party or anything else :)


Hallo zusammen und Euch allen einen wunderschönen Montag :)
Heute startet die "Osterwoche" im Forum der Scrapbook-Werkstatt mit jeder Menge toller Ideen, Tutorials und Vorlagen.
Heute möchte ich Euch zeigen, wie Ihr ganz schnell eine Osterkarte gestalten könnt.
Sie eignet sich aufgrund der Einfachheit auch gut als "Last-Minute" Karte und ist auch zur Massenproduktion gut geeignet (mit einem anderen gestempelten Text kann man die Karte ja auch für Einladungen zu einem Sommerfest oder Geburtstag oder oder oder umwandeln :) )


Let's start...
Los geht's...

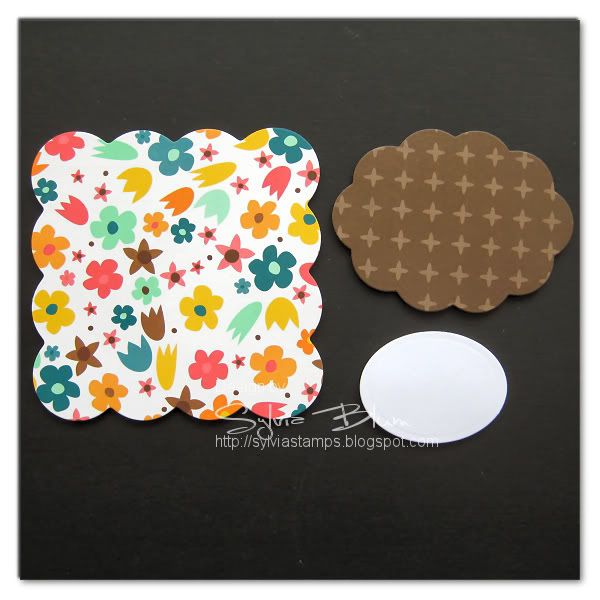
1. the die cut pieces 

die ausgestanzten Teile
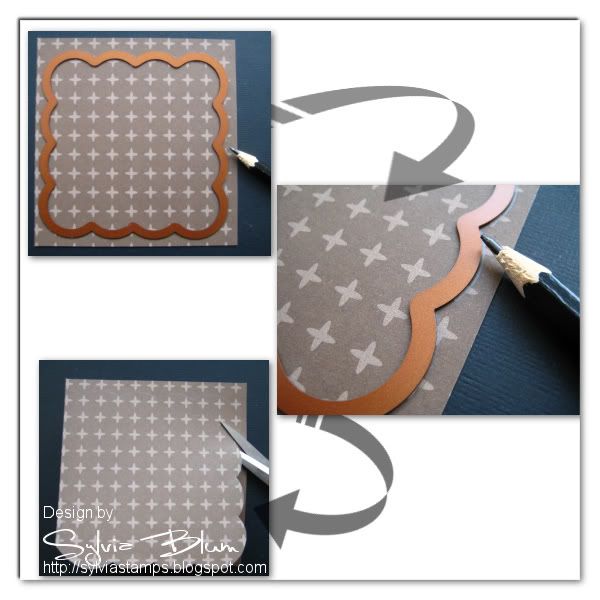
2. Because I already used the largest of the scalloped dies but wanted to create a slightly larger scalloped layer as a background for the floral paper layer, I just used the die as guide to trace around it with a pencil and then I cut it out with scissors.


Da ich für den Blümchen Hintergrund bereits die größte Stanze benutzt habe, ich aber noch einen Basis Layer in derselben Form unten drunter haben möchte, nehme ich einfach die Stanze, lege sie auf das Papier, zeichne die äußeren(!) Konturen mit Bleistift nach und schneide das anschließend von Hand aus


3. Now onto the card base. I want the cardbase to be the same shape (scalloped square) like the front of the card.
I cut a piece of white cardstock (width slightly larger than the die and length slightly larger then twice the length of the die), then folded it in half and put the onto it as you can see in the picture. The important thing is that the folded upper edge will NOT be cut!


Nun stanze ich mir eine Kartenbasis aus (ich find's nett, wenn die Karte selbst ebenfalls so einen gewellten Rand hat. Man kann diesen Punkt natürlich auch überspringen und einfach eine quadratische Karte als Basis dahinter kleben. Aber wer Lust auf eine gewellte Karte hat, kann das so machen:
Einen Streifen weißen Cardstock zurecht schneiden (Breite = Breite der Stanze + ein paar Millimeter, Länge = doppelte Breite der Stanze + ein paar Millimeter)
Den Cardstock in der Mitte falzen und die Stanze wie hier im Bild zu sehen anlegen. Der obere, gefalzte Rand (hier links im Bild) darf NICHT mitgestanzt werden!
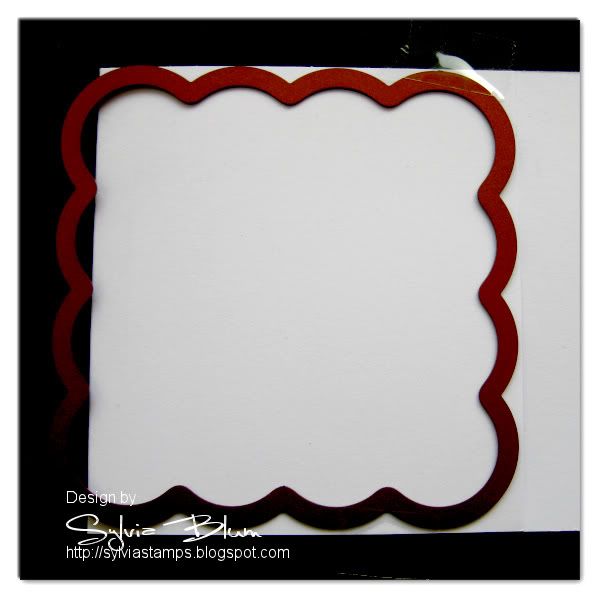

and this is the result


und das Ganze sieht dann so aus
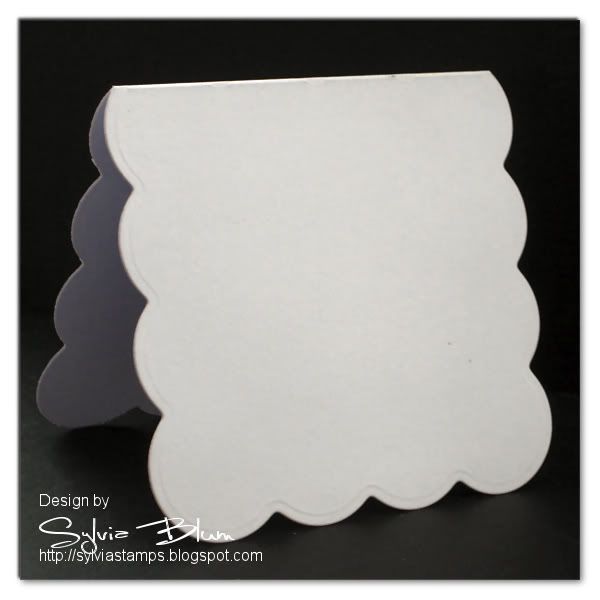

4. adhere the cardfront to the die cut card base
 

klebe die Kartenfront auf die gestanzte Karte
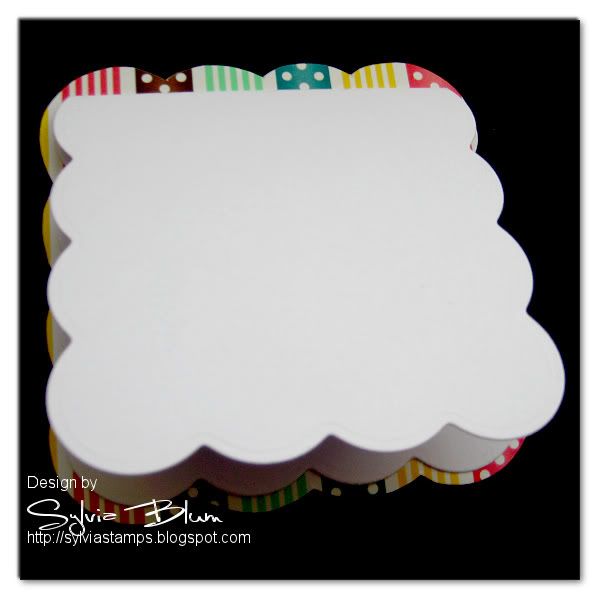

5. the rest is super simple and easy: stamp 'Happy Easter' and a tiny heart onto the white die cut oval, put on dimensional foam adhesive on all pieces and assemble, put on some rhinestones and color in the tiny stamped heart with an orange marker - done :)


der Rest ist wirklich super einfach: stempelt das 'Happy Easter' und das kleine Herz auf das weiße ausgestanzte Oval, verseht alle Teile mit 3D Schaumstoff-Klebeblöcken und setzt alles zusammen. Nun noch ein paar Rhinestones hier und da aufkleben, das Herz mit einem orangenen Stift ausmalen und fertig :)


I hope this little tutorial was helpful and understandable! If you have any questions, please leave me a comment or write me an email and I will try to answer your questions as soon as possible :)


Ich hoffe das kleine Tutorial war hilfreich und verständlich! Falls etwas nicht gut verständlich ist oder Ihr sonst noch Fragen habt, einfach her damit! 


Außerdem könnt Ihr HIER im Forum vorbei schauen, da ist das Tutorial auch nochmal zu sehen - allerdings dort noch mit ein paar mehr Bildern ;-) und es gibt noch viele weitere tolle Oster Aktionen dort!


Have fun creating Easter cards :)
Viel Spaß beim Osterkarten basteln :)  


card recipe:
 ~°~ Thanks for visiting my blog ~°~
Sylvia

A Simple Kraft Easter Tag (edited)

Hi everyone and happy Sunday :)
Today I want to show you a super quick and easy tag for Easter (it's for my parents in law's Easter basket :) )
I stamped the Chick in Easteregg directly onto kraft cardstock, then I made an oval mask from scratch paper and wiped around the edges with some Adirondack Butterscotch ink. I then stamped the Spring-Flourish stamp repeatedly around the main image (with the mask still on the image). After removing the mask, I colored everything with watercolor pencils (without using any water!) and put some Icicle Stickles around the tag edges, added a crinkled ribbon ... finished :) 

After I posted the 'finished' Easter tag I thought there's something missing.. so I made a little extra tag with a German Easter Greetings saying ('Ein schönes Osterfest')


It was really sooooo easy and quick to create, but I like the result :)


challenges:


card recipe:
  • stamps - chick in easter egg , spring flourish and German Easter Saying 'Ein schönes Osterfest'  all by LeLo Design
  • color medium - Mondeluz watercolor pencils, Adirondack inks
  • tools - Big Shot, Crop-A-Dile
  • other supplies - kraft cardstock from Bazzill, Nestabilities Label 8 dies, Icicle Stickles, crinkled ribbon from Prairie Bird Boutique (etsy), green twine from stash
  ~°~ Thanks for visiting my blog ~°~
Sylvia

Another Easter Card

Hi everyone and happy Sunday!
I hope you have a great weekend so far :) 
I'm on the go and so this is a super quick post to show you another Easter card made with one of the cute images from the new Easter collection that is now available in the LeLo Design Store.

I will post a full list of supplies in the evening when I'm back...
ETA: A huge THANKS to Donna from The Creative Cottage Challenge for choosing my card as one of the TOP3 among 300 entries!!! *woohoo*
  • stamp - bunny with easteregg by LeLo Design
  • color medium - Tombow Dual Brush pens, Mondeluz watercolor pencils
  • design papers - A Sweet Day by Sugarplum Paperie and Elise's Pieces
  • other supplies - cardstock from Bazzill, white organza ribbon from stash, heart charm from stash, paper piecing tool from stash, Tim Holtz distressing tool, Sakura white gel pen , foam pads from stash, Glue Dots Mini,
   ~°~ Thanks for visiting my blog ~°~
Sylvia

Easter is coming....

 Hi everyone and happy Friday
Woohoo.. Friday already and we have around 13°C (55°F) and sunshine!!!
So.. let's think about spring and ... Easter ;-)
Today I have an Easter card with one of the new to come Easter stamps from LeLo Design. Isn't this little chickie cuuuuuute? :)
They will be available next week in the LeLo online store.

Hallo zusammen und einen wunderschönen Freitag
Juhuu .. schon Freitag und wir haben 13°C und Sonnenschein!!!
Hach... da denkt man doch sofort an den Frühling und.... Ostern ;-)
Heute möchte ich Euch gerne eine Oster Karte zeigen, die ich mit einer der neuen und bald erhältlichen LeLo Stempel gestaltet habe. Ist dieses kleine Küken nicht einfach zuuuuuuu niedlich? :)
 Die Stempel werden voraussichtlich nächste Woche im LeLo Shop erhältlich sein.

  • stamp - Easter Chick by LeLo Design
  • color medium - Tombow Dual Brush pens, mondeluz watercolor pencils
  • design papers - 'Spring Symphony' by Lindsay Jane (guest designer at ScrapMatters in March)
  • tool - Silhouette SD machine
  • other supplies- blue cardstock from Bazzill, crinkled ribbon from Prairie Bird Boutique (etsy), Twine from Dani Peuss, decorative pearl pin from Jenni Bowlin, Stardust Stickles from Ranger, foam pads and paper piecing tool from stash, white gel pen from Sakura


~°~ Thanks for visiting my blog ~°~
Sylvia

EAC 34 - Ostern/Easter


Our challenge theme at EAC this week is EASTER.
*****
Unser Challenge Thema diese Woche bei EAC ist OSTERN.


ingredients:
copyright free easter image from www
Crate paper Lemon Grass Collection kit
(design paper and glitter border die cut)

Dovecraft ( flower charm brad )
Poppicrafts (ribbon)
Prima Marketing (hydrangea flower)
EK Success (corner rounder punch)
Ranger (distress tool)
Ancient Page (ink in Sage)
pop dots from stash


~°~ Thanks for visiting my blog ~°~

Frohe Ostern - Happy Easter - WoJ Challenge


The Whiff of Joy challenge this week is also a Guest Design Team call :-)
We had to use another great sketch from the WoJ owner Katharina. And as I got my new Spring Kit a few days ago, I decided to create a little 'scene' with some of the stamps (girl, stump, basket and little chick :-) ) I don't have any easter sentiment stamps - so I computer generated this one ('Frohe Ostern' is German for 'Happy Easter')
*****
Die Whiff of Joy Challenge ist diese Woche auch gleichzeitig verbunden mit der Suche nach einem Gast Designer :-) Wir sollten wieder einen der wunderbaren Sketche von Katharina - der Besitzerin von WoJ - umsetzen. Und da ich ja vor ein paar Tagen mein neues Spring Kit bekommen habe, dachte ich mir ich stemple mal eine kleine 'Szene' damit (ich habe das Mädchen, den Baumstumpf, den Korb und das kleine Küken benutzt :-) ) Da ich keinen Oster-Text-Stempel besitze, habe ich mir den Text ("Frohe Ostern") eben kurzerhand am Computer erstellt.


stamps:
Whiff of Joy (from the Spring Kit designed by Elisabeth Bell)

colored with
Tombow markers, Ancient Page & Adirondack inks

printed paper
digital kit 'Amore' from Shabby Princess

others:
Martha Stewart punch Lace Doily
flower from Prima Marketing
pearl brad from Rico Design
ribbon and pop dots from stash
~°~ Thanks for visiting my blog ~°~