Showing posts with label mymindseye. Show all posts

My Heart Beats For You - Valentine's Card


Hi everyone and happy Saturday :)

Today I want to share a love themed / Valentine's Day card. 
The stamps I have used here on this card are from the latest CAS-ual Fridays Stamps release, which is all about love :)

And the good news are: This "Love Notes" stamp set, which has been sold out in record time, is back in stock, again! :) 

As always, you can find the step-by-step instructions and a complete list of supplies below this post in the grey boxes :)


Thanks so much for stopping by today and I hope to see you here on my blog again, soon :)

Sylvia xx


    Instructions
  • create top folded  4 1/4" x 5 1/2" cardbase from 4 1/4" x 11" white cardstock
  • cut a 1" x 5 1/2" strip of patterned paper and distress the edges with Memento Lilac Posies using an Ink Blusher for application
  • adhere to left side of card front
  • cut a 3 1/2" x 5 1/2" strip of off-white cardstock and distress the edges with Memento Lilac Posies using an Ink Blusher for application
  • stamp music notes ("Love Notes" set) with Memento Angel Pink at the bottom of the off-white cardstock
  • overstamp music notes with sentiment ("Love Notes" set) in Memento Pear Tart
  • adhere to right side of card front
  • round lower corners of the card
  • embellish with pink sequins, green rhinestones and a green length of twine tied into bow


    Supplies


    Challenges

Don't Stop Believing


Hi everyone and happy Thursday :)

This is the second post of the day! To see my first post, please scroll down or just click here.

I just read that  Laura Davis, who was the co-owner of 2 Sketches 4 You a while back, now is back with her own sketch challenges called "Poppy Sketches" *woohoo*
I am so excited, because I always loved Lauras sketches and cards!

This is Lauras sketch for January:


close up of my card:

You can find detailed step-by-step instructions for my card below this post in the grey boxes :)

ETA:

*** Thank You ***

Thanks so much for stopping by today and I hope to see you here on my blog again, soon :)

Sylvia xx


    Instructions
  • make 4 1/4" x 5 1/2" card base from 4 1/4" x 11" white cardsock, round upper right corner
  • cut 4 1/4" x 1 3/4" piece of patterned paper, distress edges with Memento Angel Pink and an Ink Blusher, adhere to card front
  • cut a length (approx. 50") of white seam binding,  use the Craft Mat to protect your desk, then use a Memento Luxe Dandelion ink pad to directly apply yellow ink to the seam binding from both sides, until completely covered; let dry
  • wrap seam binding around card and tie into double bow
  • stamp octagon ("Stop" stamp set) with Memento Angel Pink onto scrap piece of white cardstock
  • stamp "Stop" with Memento Rose Bud into center of octagon
  • stamp "don't" and "believing" with Memento Dandelion above and below "Stop" into center of octagon
  • cut out octagon, trimming closely and adhere to card front using foam pads
  • embellish with enamel dots


    Supplies


    Challenges


Loving Thoughts Friendship Card


Hi everyone and happy Wednesday :)

Wow... January is almost over and Valentine's Day is approaching fast! Unbelievable how fast time flies, isn't it?

But today, I don't want to share a typical Valentine's card with you, but rather a friendship card :) 


Who wouldn't appreciate some "loving thoughts" in his/her mailbox? I think we should more often tell our friends how much they mean to us! Aren't friends (besides family) the most important people? I see, you agree :-D

So why not sending out "loving thoughts" to a dear friend... just because? :)

This card is a little bit unusual for me, because of the colors I've used! It did not come together "naturally", but I tried to follow a specific color theory I've learned in a workshop. In this workshop I was told, you can combine any tertiary colors and it will always look good. Therefore I tried and used a variety of tertiary colors on my card (yellow-green,  blue-violet, red-orange, orange-yellow ).


Well, well... I will definitely experiment a little further with these color theories I've learned... but not sure I will ever be comfortable with all of them *lol*

To see the step-by-step instructions and supplies I have used, please refer to the boxes below!

Thank you so much for stopping by today! And I hope you will come back and visit my blog again, soon :)


    Instructions
Extra Tip
Due to stamping over the raised patterned paper, the impression of the flower stamp was not too good and I had some little gaps in my stamped image! This is where a co-ordinating Memento marker comes in really handy! Because the exact same ink is in the markers like in the ink pad, you can fix these little *oopsies* (gaps in stamped impressions) really quick and easy! :) 

    Supplies

    Challenges


Hoppy Easter Card


Hi everyone and happy Saturday :)

Just a quick post today to share an Easter card with you. To create this card, I followed sketch #61 at CAS(E) this Sketch! 


You can find the step-by-step instructions below in the "Instructions" box and below there is a detailed list of supplies I've used.


ETA:

*** Thank You ***


Thanks so much for stopping by today and I hope to see you here on my blog again, soon :)

Sylvia xx


    Instructions
  • make 4 1/4" x 5 1/2" card base from 4 1/4" x 11" white cardstock and round lower corners
  • cut 3" x 3 1/2" rectangle of yellow patterned paper
  • cut 3" x 3/4" strip of white cardstock and create a decorative border by using a bracket border punch 
  • adhere punched strip to lower edge of yellow paper panel
  • stamp bunny with Memento Tuxedo Black onto a scrap piece of white cardstock and color with  Memento Desert Sands + Angel Pink markers
  • cut out colored bunny, trimming closely
  • stamp Easter greetings with Memento Tuxedo Black onto yellow paper panel
  • double wrap a length of rose bakers twine around the panel and tie into bow
  • embellish  bow with rose glitter rhinestone
  • adhere cut out bunny  to yellow paper panel using foam pads
  • mount yellow paper panel to card base using foam pads


    Supplies
  • stamps - Paper Smooches: Magical Spring
  • coloring medium - IMAGINE Crafts/Tsukineko Memento markers: Desert Sand, Angel Pink
  • inks - IMAGINE Crafts/Tsukineko Memento: Tuxedo Black
  • patterned papers - My Mind's Eye: Collectable Notable 6x6 paper pad
  • tools - WRMK Corner Chomper, Fiskars bracket border punch
  • others - white cardstock, rose bakers twine, Queen+Co Goosebumps rose, dimensional foam pads


    Challenges


900+ Follower Giveaway

Hi everyone and happy Thursday :)

A few days ago, the counter of my "follower" gadget switched to 900!!!

Wow!!! 
900 people who are interested in my work? 
900 peeps following my blog, just to see what little ol' me is creating? 
I'm blown away ... seriously!!!

What would a blog be without any readers?

Therefore I want to say 
THANK YOU 
to each and every one of YOU 
my faithful, lovely readers and friends!

To show my dedication and to let you know how thankful I am for YOU
I want to give away some crafty goodies to one of my blog followers :)

And since I **LOVE** my readers, this "blog candy" is all about "Love", too ;-)


1 6x6 paper pad My Mind's Eye "Cupid's Arrow"
1 pack of Pink Paislee's "Secret Crush" photograms 
1 pack of Simple Stories "Snap! Love" stickers
1 pack of Doodlebug "Sprinkles" enamel dots in "cupcake" color
1 stamp set "I Made This" by Technique Tuesday
1 stamp set "Love Letters" by Bo Bunny
1 roll of Washi Tape by Queen+Co. in red checkered
1 roll of Washi Tape with gray chevrons
Memento Dew Drop "Rose Bud"
Memento Dew Drop "Espresso Truffle"
Memento Dew Drop "Pear Tart" (not shown in picture)
Memento Dew Drop "Teal Zeal" (not shown in picture)
Memento Dew Drop "Tangelo" (not shown in picture)
an assortement of red and pink buttons


For a chance to win, you simply have to
1. be a follower of my blog ***
2. add a link to your blog to the inklinkz list below
(If you want to do me a favor, spread the word about my giveaway on your blog - but this is not mandatory)
*** one entry per capita, only - multiple entries from the same person will be deleted without further notice ***


Since I will have a few days off work during the Holidays, I thought I will keep the link list open until January 6th (last day of my holidays). 
The winner will be drawn during the following week.

Again: THANK YOU and GOOD LUCK! :)


***) you will definitely be eligible to be a winner of my giveaway if you became a follower after I posted about this giveaway. Being a "follower" means you have to appear in the "members" gadget on the upper right side of my blog (exception: friends, who comment on a regular basis, so I know, they are following me otherwise). But please be honest and only become a follower of this blog, if you really like it and not only to grab the giveaway :) Thank you!
!!! One entry per capita only !!!

Tags for Christmas Presents


Hi everyone and happy 3rd Advent Sunday :)

Only 10 more days until Christmas... *phew*... time flies!

I couldn't sleep last night and woke up at 3:30 am *sigh* So I decided, not to let grass grow under my feet, but got creative *lol* (does this sound familiar to some of you?)
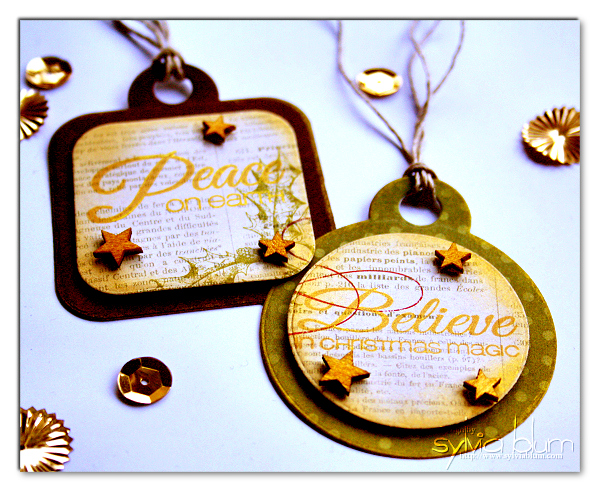
And I did some tags for our Christmas presents :-)
They are quite simple and quick to create, yet I love the look of them. Especially all the golden shimmer (I am such a sucker for all things shimmery and sparkly, and around Christmas, I especially love gold a lot ;-) )

So I went ahead and die cut left over scraps from a 6x6 paper pad by My Mind's Eye ("Lost and Found Christmas") and cut them with the "Funky Round Tag" and "Funky Square Tag" Fri-Dies from CAS-ual Fridays Stamps.

I stamped the sentiment (also from CAS-ual Fridays Stamp; from their "Christmas Carols" set) with Golden Glitz Delicata inks from Tsukineko. Oh my goodness.. how I loooove this beautiful, rich and sparkly golden ink! I just can't get enough of it. I even "colored" the small star wood veneers (Studio Calico) with the same Delicata ink, by using a sponge dauber and then dabbing the golden ink onto them. I also wiped around the edges of all patterned paper for a little bit of extra golden shimmer (did I tell you, that I am a huge fan of sparkle and shine? ;-) ).  I finished my tags with some rustic looking natural twine (to balance all of the gold).

I hope the recipients will love them as much as I do. And I hope you like them, too :)

Thanks so much for stopping by and I hope you will come back, visiting my blog soon! :)


ETA:
*** Thank You ***

    Supplies


Last Minute Christmas Cards


Hi everyone and happy Saturday :)

Today I have two last minute Christmas cards up on the CAS-ual Fridays Stamps blog.

I have used the adorable "Christmas Carols" Stamp set and stamped the sentiments with Tsukinekos Memento Luxe "Love Letter" inks. A perfect combination, IMHO :-)

These cards are so quick and easy to create, because I simply used some patterned paper and the lovely sentiments... and that's pretty much all ;-)

I hope you feel inspired and wishing everyone a happy 3rd Advent weekend!


ETA:
*** Thank You ***
(card "Peace on Earth")

    Supplies
       
       "Peace on Earth"
  • stamps - CAS-ual Fridays Stamps "Christmas Carols"
  • inks - Tsukineko: Memento Luxe - Love Letter (in Deutschland bei Mias Stempelküche erhältlich)
  • patterned papers - Lawn Fawn "Peace, Joy, Love"
  • tools - WRMK Corner Chomper
  • others - white cardstock, Knorr red star sequins, Kaisercraft ice lagoon rhinestones, Garn + Mehr white/silver baker's twine, Glue Dots mini
     
        "Believe in Christmas Magic"


CAS-ual Fridays Stamps: October Sneak Peek #1 - Halloween Cards


Hi everyone and happy Sunday :)
Hallo zusammen und Euch allen einen wunderschönen Sonntag :)
Today is the first day of the sneak peeks for the new to be released CAS-ual Fridays Stamps stamp sets and Fri-Dies!
Heute ist der erste Vorschau Tag der brandneuen Stempelsets und Stanzen von CAS-ual Fridays Stamps!
There are two new stamp sets and three new die sets *woot*
Es gibt zwei neue Stempelsets und drei neue Stanzen *juhu*
On the first sneak peek day the DT shows you projects made with this super cute Halloween set "Spooky"
ETA: Michele is releasing this early and it is available NOW *woot* 
Am ersten Sneak Peek Tag zeigt Euch das DT Projekte mit diesem super niedlichen Halloween Set "Spooky"
Nachtrag: Michele hat dieses Set nun früher zum Verkauf freigegeben und man kann es SOFORT bestelltn *juhu*


I kept my first card very simple, by just letting the funny ghost peek inside the card ;-)
Meine Karte ist wieder mal sehr einfach gehalten und ich fand es einfach putzig den kleinen lustigen Geist so von der Seite her reinblinzeln zu lassen ;-)


But wait, there is more :-D
I have another card to share with you that I made by following the current sketch at "Seize the Sketch". Of course, I used stamps from the "Spooky" set again on this second card! :)

Aber halt, ich hab' noch mehr :-D
Ich hab' nämlich noch eine zweite Karte dich ich nach dem aktuellen Sketch von "Seize the Sketch" gewerkelt habe. Natürlich habe ich auch hier wieder Stempel aus dem "Spooky" Set benutzt! :)


ETA:  
*** Thank You ***


Find more inspiration with this fun set here on the CAS-ual Fridays Stamps blog!

Schaut doch auch auf dem CAS-ual Fridays Stamps Blog vorbei! Dort findet Ihr noch viel mehr tolle Inspirationen mit diesem Set!


Supplies

card 1:
  • stamps - CAS-ual Fridays Stamps "Spooky"
  • coloring medium - Tombow Dual Brush pens: grey
  • others - AC black cardstock, orange + white cardstock, paper piercing tool, UniBall Signo white gel pen, Hero Arts ink "Orange Soda", Versafine ink "Onyx Black", May Arts orange chevron ribbon, dimensional foam pads
card 2:

    Challenges