Showing posts with label video tutorial. Show all posts

CAS-ual Fridays Stamps: Just Thinking About You


Hi everyone and happy Wednesday :)

Today I am sharing a card made with some of my most favorite supplies: I used stamps from CAS-ual Fridays Stamps' "Beanstalks" set inked up with Memento resp. Memento Luxe inks from IMAGINE Crafts/Tsukineko.

I did a little bit of masking (die cut a circle from masking tape and affixed it to the lower right of the front panel) and spritzed the white panel with some of the brand new colored texture sprays "irRESISTible" from IMAGINE Crafts. Just love the versatility of this stuff and the awesome colors it comes in...

But what is the loveliest background worth, without an appropriate focal point? ;-)
Therefore I just had to pull out a stamp set from my most favorite stamp company: CAS-ual Fridays Stamps and use it on this card :)

The sentiment was stamped in orange (to create a contrast to all the blues and greens on the card). The foliage was stamped in black, colored with Memento markers and then the right part of it was cut out -trimming closely- to adhere it to the card, allowing it to slightly overlap the white panel).

Please refer to the grey boxes below this post for detailed written step-by-step instructions!


And there is also a VIDEO tutorial available on how I did the masking technique and sprayed the irRESISTibles! Check out my YouTube channel for more video tutorials...


Thanks so much for stopping by today and I hope to see you here on my blog again, soon :)

Sylvia xx


    Instructions


    *** VIDEO available: HERE  ***

  • make 4 1/4" x 5 1/2" top folded card from white cardstock
  • cut 3 3/4" x 5 1/2" panel from white cardstock
  • die cut circle (approx. 2 3/8" diameter) from masking tape
  • affix circle to lower right side of the white panel, allowing the circle to slightly overlap on the right
  • use Craft Mat or an old packaging box to prevent your workspace from getting stained, then spray panel with irRESISTibles in Summer Sky and New Sprout
  • let the texture spray dry thoroughly (or speed up the process by using a heat tool)
  • remove circle from panel
  • stamp sentiment ("Beanstalks" stamp set) with Memento Luxe Morocco into circle
  • stamp foliage ("Beanstalks" stamp set) with Memento Tuxedo Black onto right side of the circle, slightly off the panel)
  • stamp foliage ("Beanstalks" stamp set) again with Memento Tuxedo Black onto a scrap piece of white cardstock, color with Memento Marker in New Sprout and cut out the right part of it -trimming closely (refer to close up picture above)
  • adhere cut out foliage to card, let it slightly hang over the right side
  • embellish with blue rhinestones
  • mount panel to card base using foam pads


    Supplies

Halloween Treat Box


Hi everyone and happy weekend :)
Hallo zusammen und Euch allen ein wunderschönes Wochenende :)
Today I want to share a super quick and easy to create treat box!
Heute möchte ich Euch ein super schnelles und ganz einfaches Schächtelchen zeigen!
For the box, I used a 8" x 5 1/2" piece of design paper from Teresa Collins' "Masquerade Party" collection and one of the border strips from the same collection. An adorable Zva Creative rhinestone swirl, some black rhinestones and there you have it!
Für die Box habe ich ein 8" x 5 1/2" großes Rechteck aus einem Papier von Teresa Collins' "Masquerade Party" zurecht geschnitten. Sowie eine der Bordüren aus derselben Serie. Noch einen hübschen Schnörkel-Sticker von Zva Creative und ein paar schwarze Glitzersteine hier und da und das wars auch schon!
I am adding a template below, where you can see where to score, fold, cut and glue the paper to create the box. For the sleeve, I simple cut one of the border strips and fold it around the box and then glued it on the back.
Unten findet Ihr eine Vorlage aus der Ihr die Maße ersehen könnt. Außerdem habe ich eingezeichnet wo genau Ihr schneiden, falzen und kleben müsst. Für die Banderole habe ich mir einfach eine der Bordüren genommen, sie um die Box gefaltet und dann hinten zusammen geklebt.
I also did a short video on how to create/assemble the box :)
You can find it directly on YouTube, here: http://www.youtube.com/watch?v=aiUkvmuJDu4
or just view it below ;-)
Ich habe außerdem ein kurzes Video gedreht in dem ich Euch zeige wie man die Box zusammen bastelt :)
Auf YouTube findet Ihr es hier: http://www.youtube.com/watch?v=aiUkvmuJDu4
Oder Ihr schaut es Euch direkt hier unten an ;-)


template:
Click on template to enlarge to original size; You can also right click and save it on your computer if you want to
Klickt auf die Vorlage um sie in Originalgröße anzuzeigen; Ihr könnt sie auch auf Euren Computer runterladen wenn Ihr wollt

    Supplies

Halloween Card (Video)


Hi everyone and happy Sunday :)


I am so excited I found this possibility to create my blog posts in a spreadsheet style *woohoo*
I hope this way it will be much easier to read the bilingual posts. :)
Hallo zusammen und Euch allen einen wunderschönen Sonntag :)


Ich freue mich, diese Möglichkeit der Tabellen Darstellung endlich gefunden zu haben *juhu* und hoffe damit wird dieser -zweisprachig geführte- Blog nun endlich besser lesbar :)

Now onto the Halloween card :)
Every other Sunday the Scrapbook Werkstatt DT provides a new card making tutorial or "making of" in their Inspirations gallery. 
Today is my turn and I decided to do a video on how I did the above Halloween card. 

Jetzt aber endlich zur Halloween Karte:
Jeden zweiten Sonntag gibt es eine neue Anleitung oder einfach ein "schau zu wie ich es gemacht habe" in der Karten Werkstatt der Scrapbook Werkstatt.
Heute bin ich wieder dran und ich hab' mir überlegt, das ich Euch in einem Video einfach mal zeige wie ich die obige Halloween Karte gemacht habe.
Featured techniques:
- ink distressing
- heat embossing
- fussy cutting
Verwendete Techniken:
- Papierränder mit Stempelfarbe wischen
- Embossen (heat embossing)
- Konturengenaues Ausschneiden von Motiven

Since I know many of my blog readers don't speak German, I did two versions of the video: one is the official for Scrapbook Werkstatt (German only) and I also did another version: still spoken in German but with English subtitles :)
I hope you will like it!

Ihr findet die Inspirations Gallerie der Scrapbook Werkstatt mit vielen verschiedenen Kategorien (auch Scrapbooking, Mixed Media und weiteren) hier  
Die "Karten Werkstatt" findet Ihr hier und meinen Beitrag findet Ihr direkt hier
Viel Spaß beim Schauen und Nachmachen!


Here is the video version with English subtitles:


    Measurements/ Zuschneide Maße

   white cardstock / weißer Cardstock: 
   - 4 1/2 Inches x 9 Inches 
    ( score at 4 1/2 Inches to create the card base / bei 4 1/2 Inches falzen um einen Kartenrohling herzustellen)
   - 3 Inches x 3 Inches

   "Trick or Treat" paper / Papier:
   - 4 1/4 Inches x 4 1/4 Inches
   - 4 1/4 Inches x 1 1/4 Inches

   "Web"  paper / Papier:
   - 2 7/8 Inches x 2 7/8 Inches


    Supplies


How To: Gradient Stamping (Video)


Hi everyone and happy Saturday :)
Hallo zusammen und Euch allen einen wunderschönen Samstag :)
You may have seen this card I blogged yesterday
I received some questions on how I did the colored stamping, therefore I thought I'd just make a quick little video tutorial to show you how I do it.
I hope you'll find this short video helpful (I speak German but added English subtitles :) ) 
Ihr habt vielleicht bereits diese Karte gesehen, die ich gestern gebloggt habe! Ich habe daraufhin einige Anfragen bekommen, wie ich das denn gemacht habe mit den Farben beim Stempeln, also dachte ich mir ich mache eine kleine Video Anleitung und zeige Euch wie ich das mache.
Ich hoffe Ihr findet das kurze Video hilfreich.
Oh and if you ever try this technique I would be thrilled if you'd let me know and share the results with me!!!
I would like to feature your results on my facebook page, too :)

A complete list of supplies can be found ***here***
Oh und falls Ihr diese Technik mal ausprobieren solltet, würde ich mich riesig freuen, wenn Ihr mir Bescheid gebt und mir Eure Ergebnisse zeigt!!!
Ich würde diese dann gerne auch auf meiner Facebook Seite vorstellen :)

Die vollständige Materialliste findet Ihr ***hier***


Video: "Sweet" Scrapbook Page


Hi everyone and happy Sunday :)
Today I want to share a scrapbook page and a short video on how I made it.

But before I go on, I want to remind you of this (one last time *lol*):
 Google Reader will be stopped as of July 1st - that's MONDAY!!!
This means, only ONE DAY left to import your RSS feed from Google Reader to Bloglovin'
If you want to keep all your subscriptions and import your RSS feed from Google Reader to Bloglovin', you can find a easy "how to" I have written HERE
To follow my blog on bloglovin', simply click on the button below
Follow on Bloglovin 

Hallo zusammen und Euch allen einen wunderschönen Sonntag :)
Heute möchte ich Euch ein Scrapbooking Layout zeigen. Dazu gibt's außerdem ein kurzes Video indem ich Euch zeige, wie ich es gemacht habe.

Aber bevor ich Euch das zeige, möchte ich Euch noch einmal daran erinnern das Google Reader ab morgen nicht mehr verfügbar ist!!!  Falls Ihr weiterhin Updates meines Blogs bequem in Eurer Mailbox oder über einen Reader lesen wollt, wäre die einfachste Möglichkeit Euren RSS Feed von Google Reader nach Bloglovin' zu importieren. Wie das geht, könnt Ihr HIER nachlesen.
Oder Ihr klickt einfach oben auf den "Follow this blog with bloglovin'" Knopf oder aber oben rechts in meiner Sidebar auf den blauen Knopf mit dem "b" :)
 
Now back again onto the scrapbook page:
This was my second round entry for the Spellbinders DT contest.
I scrapped pictures of my oldest son Daniel when he was 1 year old.
Daniel recently turned 21(!!!) 
Oh my goodness...... am I really so old? *eek*

Nun aber zurück zu meinem Scrapbook Layout:
Es handelt sich hierbei um meinen Beitrag für Runde 2 im Spellbinders DT Contest.
Ich habe hier Fotos meines ältesten Sohnes Daniel verscrappt.
Damals war er gerade ein Jahr alt und kürzlich hat er seinen 21.(!!!) Geburtstag gefeiert!!!
Ach Du  meine Güte... bin ich wirklich schon so alt? *ojeojeoje*

Video:

(the assignment was to make a hands only "making of" video that should be 3-5 minutes
die Aufgabe war ein Video von der Entstehung des LO zu machen, das zwischen 3-5 Minuten dauert)


You can view it on YouTube directly, if you are having problems viewing it here on my blog (I am having problems viewing videos on blogs myself, when using IE10!):
Falls Ihr Probleme habt, Euch das Video hier auf dem Blog anzuschauen (ich habe bspw. Probleme mit meinem IE10!), dann könnt Ihr Euch das Video auch direkt bei YouTube ansehen:
http://www.youtube.com/watch?v=xxBh7a1SoSA


some detail shots / ein paar Detailaufnahmen


materials:

~°~ Thanks for visiting my blog ~°~
Sylvia

How To: Create a Pinwheel Birthday Card


Hi everyone and happy Wednesday!
Today I'm sharing a CAS Birthday card with you where I used one of the beautiful papers that came with the Scrapbook Werkstatt June Kit!
To create the cute pinwheel on the card I used a soft and pastel colored patterned paper from Studio Calico's "Atlantic" collection.

I also have a (english) step-by-step video for you, where I show how I made this card.
And I am also sharing some little tips and tricks along the way :)
I hope you like it!


*** You can also view the Video directly on YouTube ***

Hallo zusammen und Euch allen einen wunderschönen Mittwoch :)
Heute möchte ich Euch eine CAS (clean and simple) Geburtstagskarte zeigen, die ich mit einem der hübschen Papiere aus dem Scrapbook Werkstatt Juni Kit "Seemannsgarn" gewerkelt habe!
Ich habe ein sehr pastelliges Papier aus Studio Calico's "Atlantic" Serie für mein kleines Windrädchen auf der Geburtstagskarte verwendet.

Ich habe außerdem auch ein (deutschsprachiges) Schritt-für-Schritt Video für Euch, in dem ich den Entstehungsprozess dieser Karte zeige und auch einige Tipps und Tricks verrate :)
Ich hoffe es gefällt Euch!


*** Das Video könnt Ihr auch direkt auf YouTube anschauen ***

detail shots / Detailaufnahmen:


My crafting friend Baerbel Born recently also shared a picture tutorial on how to create a pinwheel for your garden, you can check it out HERE
Meine Bastel-Freundin Bärbel Born hat kürzlich ebenfalls eine bebilderte Anleitung für ein Garten-Windrädchen gepostet. Ihr findet es HIER.

card recipe:

*** patterned papers and cork stickers are content of  ***
*** Scrapbook Werkstatt's June Kit "Seemansgarn" ***

~°~ Thanks for visiting my blog ~°~
Sylvia

Video Tutorial: Gatefold Card "Magical Day"

  Hi everyone and happy Tuesday :)
Have you seen the gatefold card, I blogged yesterday? I already told you that I will provide a little tutorial on how to create a simple gatefold card like this.
So, I've done this short video for everyone who is interested :)

*** click here to watch the video on YouTube ***

In the video, I will show you how I created this shabby chic card using patterned papers from Authentiques "Cherish" collection, a stamp from the "Fairy Fantasy Circle Postmarks" set by Whimsy Stamps and some Spellbinders lacey and standard circle dies.
I hope you enjoy :)

Hallo zusammen und Euch allen einen wunderschönen Dienstag :)
Habt Ihr meine Gatefold Karte gestern gesehen?
Ich hatte da ja auch schon gesagt, das ich Euch eine kleine Anleitung zur Verfügung stellen werde, wie man diese einfache Gatefold Karte macht.
Und hier kommt es auch schon: Ein kurzes Anleitungs-Video für alle Interessierten :)

*** hier klicken um das Video auf YouTube anzuschauen ***

Im Video zeige ich Euch wie ich diese Shabby Chic Karte mit Papieren aus Authentiques "Cherish" Serie, einem Stempel aus dem "Fairy Fantasy Circle Postmarks" Set von Whimsy Stamps, sowie Spellbinders Lacey und Standard Circles Stanzen gemacht habe.
Ich hoffe es gefällt Euch :)

top view / von oben:
open / geöffnet:
card recipe:


~°~ Thanks for visiting my blog ~°~
Sylvia

Scrapbook Werkstatt Advent Blog Hop


Hi everyone and happy Sunday :)
Today I have a special post to share because it is part of the Scrapbook Werkstatt Advent (Inspirations) Blog Hop! 
If you want to be inspired, then I'll encourage you to hop through the complete list of blogs, because there are some super awesome projects!
The starting point of our blog hop is on the Scrapbook Werkstatt blog **HERE** :)

Hallo zusammen und Euch allen einen wunderschönen Sonntag :)
Heute hab' ich ein spezielles Posting für Euch, denn es ist Teil des Scrapbook Werkstatt Advent (Inspirations) Blog Hops!
Es gibt dabei heute nicht nur jede Menge toller Inspirationen für die (Vor-)Weihnachtsbastelei, sondern es gibt natürlich auch wieder was zu gewinnen :)
Ihr wollt mitmachen und gewinnen? Dann lest ganz unten nach, wie es geht ;-)

Now onto my project:

I've created some winter-y place cards (for my son Aaron's 10th Birthday on December 29th). But you can easily adopt these place cards into Christmas related ones, by simply use more traditional Christmas colors, like red, green, gold :)

Nun aber zu meinem Projekt:
Ich habe winterliche Platzkarten gestaltet (für den 10. Geburstag meines Sohnes Aaron am 29.12.). Aber man kann diese Platzkärtchen ganz leicht für Weihnachten passend umwandeln, indem man dann eben einfach eher rot/grün/goldene Farben und Papiere benutzt :)
 Here are some step-by-step instructions 
(you can find a video at the end of this post, too)
 
Hier eine kleine Schritt-für-Schritt Anleitung (am Ende des Posts befindet sich auch noch ein Video)


You will need a 4x5'' piece of white cardstock for every place card.
Score it at 2.5'' to create the place card base.
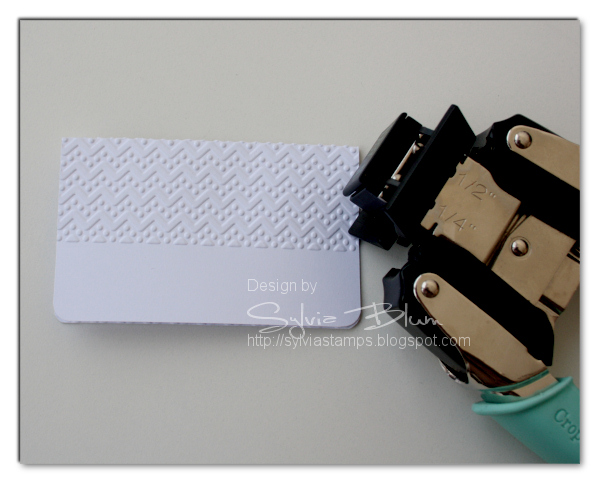
Then place your white cardstock into the embossing folder, so a small stripe will be left un-embossed :

Ihr braucht  ein Stück weißen Cardstock für jede Platzkarte in 4x5'' (d.h. ca. 10,2x12,7 cm)
Dann falzt Ihr es in der Mitte, bei 2.5'' (also bei 5,1cm) um den Platzkarten-Rohling zu erhalten
Dann positioniert Ihr den weißen Cardstock so im Embossing Folder, das unten ein schmales Stück übrig bleibt, das nicht embosst wird:
After I did the embossing, I folded it in half and rounded the corners using a corner rounder tool
Nach dem Embossen hab' ich die Platzkarte wieder in der Hälfte gefaltzt und dann die unteren Ecken mit einem Eckenrunder abgerundet

 Then I die cut the snowflake from white cardstock, stamped one of the "Snowflakes Mini Letter Seals" stamps with black ink onto a scrap piece of Bo Bunny paper from the "Snow Day" collection and cut it out with my scissors, trimming closely. Then I adhered this cut out stamp onto the snowflake die.
  Dann hab' ich die Schneeflocke aus weißem Cardstock ausgestanzt, habe den "Snowflakes Mini Letter Seal" Stempel mit schwarzer Stempelfarbe auf einen Schnipsel Bo Bunny Papier (aus der "Snow Day" Serie) gestempelt und den anschließend mit der Schere konturengenau ausgeschnitten und dann auf die ausgestanzte Schneeflocke geklebt.

  I've added a bit of sparkle by using a Sakura Stardust gel pen and also some white accents by using a Sakura white gel pen. Adhered some matching Duo Washi tape from Scrapbook Werkstatt and created the name with mini alphabet stickers from Authentique (that happens to match the colors from the Bo Bunny paper just perfectly)
Et voila! You're done! Easy peasy and great for mass production :)

Ich hab' dann noch ein wenig Glitzer hinzugefügt, indem ich mit einem Sakura Stardust Gel Stift Akzente gesetzt habe. Außerdem noch ein paar weiße Akzente hier und da mit einem weißen Sakura Gel Stift.
Jetzt noch etwas passendes Washi Tape von der Scrapbook Werkstatt auf das Kärtchen geklebt und zum Schluss noch den Namen mit Mini Alphabet Stickern von Authentique aufgebracht (zufällig haben die Alphabet Sticker farblich perfekt zum Bo Bunny Papier gepasst :) )
Et voila! Das war's auch schon! Super einfach und perfekt für die Massenproduktion :)
    
Close up / Detailaufnahme:
  
Ihr wollt mitmachen und gewinnen?   Unter allen Teilnehmern, die bis zum 9. Dezember 2012 mitmachen, verlost die Scrapbook-Werkstatt einen Einkaufsgutschein im Wert von sagenhaften 20€. Um im Lostopf zu landen müsst ihr folgendes tun:
  • hinterlasst auf jedem Blog der teilnehmenden Designteammitglieder jeweils einen Kommentar
  • zeigt uns Eure Umsetzung zum Thema Weihnachten auf Eurem Blog
  • hinterlasst dann auf dem SBW-Blog einen Kommentar mit Link zu eurem Werk. 
  • auch ohne Blog könnt ihr mitmachen! Schickt euer Werk einach an Tina & Mireia: shop@scrapbook-werkstatt.de; und hinterlasst danach einen Kommentar auf ihrem Blog.
Falls Ihr mitmachen möchtet, aber nicht von Bernadette's Blog kommt, dann fangt einfach nochmal vorne an auf dem Scrapbook-Werkstatt Blog :)
Wenn Ihr von Bernadette's Blog aus hierher gehüpft seid, dann seid Ihr auf dem richtigen Weg und weiter geht's bei:
VANESSA
 (aber nicht vergessen mir vorher noch einen Kommentar zu hinterlassen, falls Ihr im Lostopf für den Gewinn landen möchtet ;) )

English:


Deutsch:


project recipe:
   ~°~ Thanks for visiting my blog ~°~
Sylvia

'Thinking of You' Card with Video Tutorial

I made this card to show the results of my 'distressing' tutorial over at ScrapMatters Hybrid Bootcamp
I also made a little video to show the basics of distressing. The video is part of my lesson post over at the ScrapMatters forums.


credits:

other supplies:
clear stamps from Inkadinkado (swirl and sentiment)
Onyx Black Versafine ink (Tsukineko)
Vintage Photo Distress inks (Ranger)
Butterscotch Adirondack inks (Ranger)
brown cardstock (Bazzill)
brown ribbon (from Poppicrafts)
green ribbon (Rico Design)
Frosted Lace Stickles (Ranger)
selfadhesive crystal gemstones (Prima Marketing)
pop dots (from stash)

~°~ Thanks for visiting my blog ~°~