Showing posts with label tag. Show all posts

Thanks For Everything


Hi everyone and happy Monday :)
Today I am sharing a "Thank You" / "Friendship" card with you, that I created for this weeks Clean and Simple Card Challenge at Splitcoaststampers. The challenge this week is to create a clean and simple card with a tag or tab. I decided to go with the tag :)

I don't have tag die, so I just created this one myself by cutting a rectangle from white cardstock and using a regular circle die to create the curve on top of the tag. 

As always, you can find the detailed step-by-step instructions and a complete list of supplies below this post in the grey boxes :)


Thanks so much for stopping by today and I hope to see you here on my blog again, soon :)

Sylvia xx


    Instructions
  • make 4 1/4" x 5 1/2" card base from 4 1/4" x 11" white cardstock and round lower corners
  • cut 2 1/4" x 4 1/4" rectangle from white cardstock, slip upper edge of tag through circle die and run through die cutting machine to create a curve on top of the tag and punch small hole into tag
  • cut 2 1/4" x 1" piece of pink patterned cardstock and adhere to lower part of the tag
  • wrap a pink twine around the tag twice and tie into a bow
  • randomly stamp butterflies ("Butterbows") with Memento Angel Pink onto upper part of tag
  • stamp sentiment parts ("Wallflower") with Memento Gray Flannel onto tag (over butterflies)
  • cut a length of white seam binding (approx. 6") and color with Memento Luxe Lilac Posies by wiping the ink pad over the seam binding
  • allow ink to dry completely and affix to tag
  • mount tag to card base using dimensional foam pads
  • embellish with clear rhinestones

    Supplies

    Challenges


Tags for Christmas Presents


Hi everyone and happy 3rd Advent Sunday :)

Only 10 more days until Christmas... *phew*... time flies!

I couldn't sleep last night and woke up at 3:30 am *sigh* So I decided, not to let grass grow under my feet, but got creative *lol* (does this sound familiar to some of you?)
And I did some tags for our Christmas presents :-)
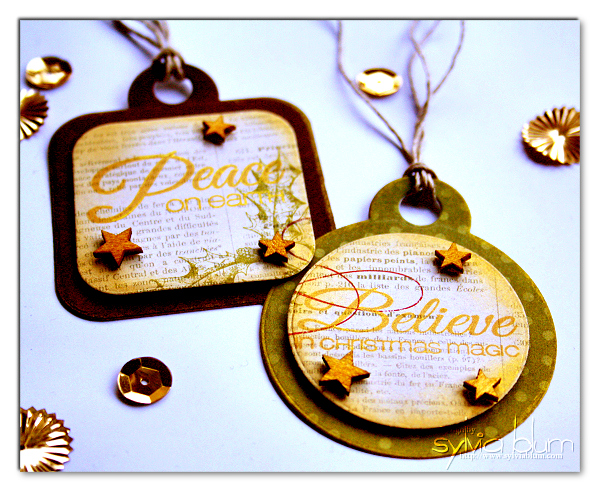
They are quite simple and quick to create, yet I love the look of them. Especially all the golden shimmer (I am such a sucker for all things shimmery and sparkly, and around Christmas, I especially love gold a lot ;-) )

So I went ahead and die cut left over scraps from a 6x6 paper pad by My Mind's Eye ("Lost and Found Christmas") and cut them with the "Funky Round Tag" and "Funky Square Tag" Fri-Dies from CAS-ual Fridays Stamps.

I stamped the sentiment (also from CAS-ual Fridays Stamp; from their "Christmas Carols" set) with Golden Glitz Delicata inks from Tsukineko. Oh my goodness.. how I loooove this beautiful, rich and sparkly golden ink! I just can't get enough of it. I even "colored" the small star wood veneers (Studio Calico) with the same Delicata ink, by using a sponge dauber and then dabbing the golden ink onto them. I also wiped around the edges of all patterned paper for a little bit of extra golden shimmer (did I tell you, that I am a huge fan of sparkle and shine? ;-) ).  I finished my tags with some rustic looking natural twine (to balance all of the gold).

I hope the recipients will love them as much as I do. And I hope you like them, too :)

Thanks so much for stopping by and I hope you will come back, visiting my blog soon! :)


ETA:
*** Thank You ***

    Supplies


Joy To The World


Hi everyone and happy Tuesday :)
Have you seen the gorgeous "new" August releases from CAS-ual Fridays Stamps yet?
Michele has designed two fantastic Christmas related stamp sets! One of them is the "Christmas Carols" from which I used the sentiment for my tag.
Ohhhhh... and speaking about the tag: It's one of three brand new "Fri-Dies" :)
Yes! You read it right: CAS-ual Fridays Stamps now has it's own die designs *woot woot*... I am sooo excited! :)
So I have used the "Oval Tag Fri-Dies" to create this Holiday tag. 
BTW: This is another entry for the Holiday Gift Tag Challenge over at Moxie Fab World
The "Oval Tag Fri-Dies" is a set of two dies (see picture below) and I used both dies to cut the tag + oval frame from white cardstock. Then I put the thin oval ring onto some tiny bits of foam tape to give it some dimension. Afterwards I covered it with gold using a Krylon pen.
The sentiment was stamped with red Hero Arts onto the tag base, so it fit's inside the small oval frame.
I then used a huge golden gemstone brad and some red baker's twine (adhered with a glue dot) to embellish it.

Hallo zusammen und Euch allen einen wunderschönen Dienstag :)
Habt Ihr eigentlich schon die wundervollen August "Neu"-Erscheinungen von CAS-ual Fridays Stamps gesehen? Michele hat zwei fantastische Weihnachts Stempelsets designed! Eines davon ist "Christmas Carols", welches ich hier für mein Anhängerchen verwendet habe.
Ohhhhh.. .und wo ich gerade vom Anhänger spreche: Es gibt außerdem drei brandneue "Fri-Dies" :)
Ja! Ihr habt richtig gelesen: CAS-ual Fridays Stamps hat nun auch eigene Stanzen *juhuuu*.... ich freu mich echt wie verrückt darüber! :)
Also habe ich hier auch gleich die "Oval Tag Fri-Dies" Stanzen für mein Weihnachts-Hängerchen verwendet.
Übrigens mache ich mit diesem Hänger auch bei der Holiday Gift Tag Challenge bei Moxie Fab World mit.
Das "Oval Tag Fri-Dies" Set beinhaltet zwei Stanzen (Siehe auch Foto unten) und ich habe hier beide benutzt um damit den Anhänger, sowie den dünnen ovalen Rahmen aus weißem Cardstock zu stanzen. Den schmalen ovalen Ring habe ich dann auf winzige Stückchen von 3D Pads gesetzt. Anschließend habe ich ihn vergoldet mithilfe eines Krylon Stifts.
Der Spruch wurde mit roter Stempelfarbe so auf das Hängerchen gestempelt, das er in dem ovalen Rahmen zu sehen ist. Dann hab' ich das Ganze noch mit einem überdimensionalen goldfarbenen Glitzerstein-Brad und rotem Baker's Twine (das ich mit einem Glue Dot angeklebt habe) verziert.


    Supplies


    Challenges


~°~ Thanks for visiting my blog ~°~
Sylvia

Christmas Tags in August


Hi everyone and happy Wednesday :)
Today I'm sharing some Christmas tags with you that I made for the Holiday Gift Tag Challenge in the Moxie Fab World
These tags are super quick and easy to create - great for mass production!
I have used the "Merry Kiss-Mas" stamp set from CAS-ual Fridays Stamps, kraft cardstock and a leftover piece of a red chevron patterned paper to paper piece the little presents. Adhering some rhinestones, adding some golden glitter gel pen and put on some red baker's twine - that's it :)

Hallo zusammen und Euch allen einen wunderschönen Mittwoch :)
Heute möchte ich Euch ein paar Weihnachts-Anhänger zeigen, die ich für Holiday Gift Tag Challenge in the Moxie Fab World gemacht habe.
Diese Anhänger sind wirklich super schnell und einfach zu machen - super geeignet um gleich viele auf einmal zu machen!
Ich habe das "Merry Kiss-Mas" Stempelset von CAS-ual Fridays Stamps, kraft cardstock und ein übrig gebliebenes kleines Stückchen rotes Chevron Papier um die kleinen Geschenke darauf zu stempeln und sie dann auszuschneiden. Dann noch Glitzersteinchen, etwas goldenen Glitzergelstift und rotes Baker's Twine.. fertig :)


    Supplies
  • stamps - CAS-ual Fridays Stamps:  "Merry Kiss-Mas"
  • patterned papers - ILS - Why Not?
  • tools - WRMK "Crop-A-Dile" 
  • others - kraft cardstock, UniBall Signo white gel pen, paper piercing tool, Kaisercraft rhinestone clear, Versafine inks "Onyx Black", The Twinery red baker's twine, golden glitter gel pen


    Challenges

Follow me:
follow me on bloglovin' get updates via email
~°~ Thanks for visiting my blog ~°~
Sylvia

O Holy Night - Fussy and Fancy GDT


Hi everyone and happy Friday :)
Today I'm sharing another tag with you - I just **love** making tags, recently - and I hope you are not tired of seeing them ;-)  This tag was made for my guest DT gig at Fussy and Fancy Challenge and this fortnight challenge is to create something to show "I Love Christmas" (and I definitely do!) - thanks so much for having me!!!

 Ok, now some details about the tag and how I've done it:
The tag itself is cut from a light Bo Bunny "Rejoice" paper. I've distressed the edges using a distressing tool, some Distress Stain in "picket fence" and Distress inks in Walnut Stain.
After it was dry, I went over the edges with some Glitter Glam "Chandelier" (clear with iridescent glitter particles in it)

Then I die cut some pieces of plain light cardstock using the Venetian Motifs and the Venetian Accents sets from Spellbinders Paper Arts. I wiped the Walnut Stain distress inkpad right over the cut out pieces and added some drops of red Sprinklers from October Afternoon to the flourish die.. just a teeny tiny little bit
After everything was dry, I also added the Glitter Glam to the die cuts! This helps to make them a bit more sturdy and gives a nice shimmer and texture, too.

Then I stamped the beautiful "O Holy Night" sentiment image (from Whimsy Stamps "Holiday Carols Notables 4" set) to another piece of the light Bo Bunny Rejoice paper, then cut it out with my scissors.
Then I cut out some red Bo Bunny paper with the "Notables 4 Die" and some green Bo Bunny paper with the "Holly Branch Notables 4 Die", mounted everything by using adhesive tape and dimensional foam tape!
Adhered some satin and crinkled ribbon... finished!

Looks (and maybe reads) more complicated than it really was ;-)

Hallo zusammen und Euch allen einen wunderschönen Freitag :)
Heute zeige ich Euch mal wieder ein Tag - ich **liebe** Tags in letzter Zeit wirklich sehr - und ich hoffe Ihr seid es nicht bereits müde, die zu sehen ;-) Das Tag habe ich für meinen Gast-DT Auftritt (oder wie sagt man das auf deutsch? *lol*) bei Fussy and Fancy Challenge gestaltet. Das Thema der Challenge, die heute beginnt und zwei Wochen läuft ist "I Love Christmas" (was ich definitiv tue) - herzlichen Dank, das ich bei Euch Gast sein darf!

Ok, jetzt ein paar Details zu dem Tag und wie ich es gestaltet habe:
Das Tag selbst habe ich aus einem hellen Bo Bunny "Rejoice" Papier zugeschnitten. Dann habe ich die Ränder distressed, indem ich ein Distressing Tool, Distress Stain "picket fence", sowie Distress Stempelfarbe in Walnut Stain benutzt habe. Nachdem das getrocknet war, bin ich noch großzügig mit Glitter Glam "Chandelier" rundum gegangen (das ist klar mit irisierenden Glitzer-Teilchen).

Dann habe ich noch ein paar Teile mit dem Venetian Motifs und dem Venetian Accents Set von Spellbinders Paper Arts aus hellem Cardstock ausgestanzt. Ich hab' die ausgestanzten Motive dann direkt mit dem Walnut Stain Distress Stempelkissen bearbeitet und habe außerdem noch ein mini-mini-bisschen rote Sprinklers von October Afternoon hinzugefügt beim Schnörkel.
Nachdem das alles getrocknet war, habe ich auch hier wiederum großzügig von dem Glitter Glam aufgetragen. Das macht die ausgestanzten Teile nicht nur stabiler, sondern gibt ihnen auch einen hübschen Glanz und auch noch etwas Textur!

Anschließend habe ich den hübschen "O Holy Night" Stempel (aus dem Whimsy Stamps "Holiday Carols Notables 4" Set) auf ein weiteres Stückchen von dem hellen Bo Bunny Rejoice Papier gestempelt und mit der Schere rundum ausgeschnitten.
Danach habe ich noch Teile aus rotem Bo Bunny Papier mit der "Notables 4 Die" Stanze und aus grünem Bo Bunny Papier mit der "Holly Branch Notables 4 Die" Stanze ausgestanzt und dann alles zusammen gesetzt - teilweise mit normalem doppelseitigem Klebeband, teilweise mit 3D Klebe Pads!
Noch ein Satinband und ein geknüddeltes Bändchen am Tag angebracht - und schon fertig!

Es sieht (und liest sich vielleicht auch) komplizierter aus, als es tatsächlich war ;-)


***thank you***
 (post #7)

tag recipe:
challenges:

~°~ Thanks for visiting my blog ~°~
Sylvia

Gifts of Time and Love...


Hi everyone and happy Monday :)
Today I'm sharing a simple tag that I've created using the negative from the Whimsy Stamps "Christmas Tree" die. I simply created a tag base from a piece of kraft cardstock (3 x 5.5), rounded the corners and punched a hole at the top of it. Then I die cut the tree at the bottom of the tag and adhered some Bo Bunny "Snow Day - Dot" paper behind the cut out tree.
Then I did a little bit of faux stitching (yes, I admit: I'm addicted to this technique *lol*).
The sentiment (Whimsy Stamps: "Christmas Sayings") was stamped with Versamark and then embossed with white detailed embossing powder.  Adding some green ribbon, kraft twine and a little heart charm ... et voila, it's finished!


Hallo zusammen und Euch allen einen wunderschönen Montag :)
Heute zeige ich Euch ein Tag (bzw. ein Lesezeichen) das ich mit dem Negativ der Whimsy Stamps "Christmas Tree Die" Stanze gemacht habe.
Ich habe dazu einfach das Lesezeichen aus einem Stück Kraft Cardstock (3 x 5,5 Inches) gemacht, die Ecken gerundet und dann noch ein Loch oben gestanzt. Dann hab' ich den Weihnachtsbaum aus dem unteren Teil herausgestanzt und ein Stückchen Bo Bunny "Snow Day - Dot" Papier hinter den ausgestanzten Baum geklebt.
Danach noch rundum "faux stitching" (jaja, ich geb's zu: es geht kaum ohne bei mir *lol*)
Der Spruch (Whimsy Stamps: "Christmas Sayings") wurde mit Versamark gestempelt und dann mit einem feinen weißen Embossingpulver embosst. Noch ein grünes Bändchen, ein Stück Twine und ein Herz-Embellishment dran ... et voila, schon fertig!


tag recipe:
challenges:
   
~°~ Thanks for visiting my blog ~°~
Sylvia

Tutorial: Venetian Tag


Hi everyone and happy Wednesday :)
Today, my monthly contribution for the Spellbinders Blog is due and this week is all about using M-Bossabilities on their blog. So I decided to create a tag to show you a technique on how you can achieve lots of depth and texture with the M-Bossabilities folders. Doesn't this background look a bit like an antique fresco in a historic Venetian palazzo? ;-)
Hope you like my tag and you'll find my step-by-step instructions helpful. You can find the tutorial HERE
I would be delighted if you'd leave me a comment over there :-)

Hallo zusammen und Euch allen einen wunderschönen Mittwoch :)
Heute ist mein monatlicher Beitrag für den Spellbinders Blog fällig und diese Woche dreht sich auf deren Blog alles um das Thema M-Bossabilities. Also hab' ich mir gedacht, ich mache ein Tag und zeige Euch daran eine Technik, wie Ihr mit Hilfe der M-Bossabilities so richtig schön viel Tiefe und Textur in/auf Euer Projekt zaubern könnt. Sieht dieser Hintergrund nicht ein bisschen aus wie ein antikes Fresko in einem historischen venetianischen Palazzo? ;-)
Ich hoffe das Tag gefällt Euch und Ihr könnt vielleicht auch was mit meiner Schritt-für-Schritt Anleitung anfangen, die HIER zu finden ist.
Über einen Kommentar dort auf dem Blog würde ich mich übrigens sehr freuen! Darf gerne auch in deutsch sein :-)


challenges:
 
 ~°~ Thanks for visiting my blog ~°~
Sylvia

Spooky Kitty

 
 Hi everyone and happy Tuesday :)
No it's not Halloween yet, but since I just **love** this holiday (even though we don't celebrate it the way my friends from the States do it) and I have these adorable MME Lost&Found Halloween papers here on my desk, I just couldn't resist and had to create this Halloween tag :)
I covered a manila tag with some patterned glitter paper, then I cut out the 'Spooky' and the cat with my Silhouette SD cutting machine from black cardstock. The little circle tag "Trick or Treat" is a stamp from Hero Arts. It's from a stamp set I won last year in one of the contests they are hosting on their blog :)

Hallo zusammen und Euch allen einen wunderschönen Dienstag :)
Nein, es ist natürlich noch nicht Halloween, aber da ich diese Festivität wirklich **liebe** (obwohl wir das hier ja nicht in der Art feiern, wie das in den Staaten üblich ist) und da ich hier ein paar wunderbare MME Lost&Found Halloween Papierchen herum liegen hatte, konnte ich einfach nicht widerstehen und musste einfach dieses Halloween Tag zaubern :)
Dafür habe ich ein Manila Tag mit dem Glitzerpapier überzogen, dann das "Spooky" und die Katze mit meiner Silhouette SD Schneidemaschine aus schwarzem Karton ausgeschnitten. Das kleine runde Tag oben "Trick or Treat" ist ein Stempel von Hero Arts. Er ist aus einem Stempelset den ich letztes Jahr in einem Wettbewerb auf deren Blog gewonnen habe :)

And tomorrow I will have one more Halloween project for you! ;-)
Und morgen habe ich noch ein Halloween Projekt für Euch! ;-)


tag recipe:
  • stamps - Hero Arts "Spooky Halloween"
  • coloring medium - Tombow Dual Brush pen in orange
  • patterned papers - My Mind's Eye "Lost & Found - Halloween - Hallows Rounds"
  • tools - Spellbinders Paper Arts "GC-001 Grand Calibur" die cutting machine, Silhouette SD electronic cutting machine
  • dies - Spellbinders Paper Arts "S4-114 Standard Circles Lg", Silhouette America Store "Spooky Phrase" by Lori Whitlock (electronic cutting file)
  • others - American Crafts black cardstock, silver star metal charm from stash, Halloween ribbon from stash, dimensional foam adhesive from stash
challenges:

 ~°~ Thanks for visiting my blog ~°~
Sylvia

{DT} - Let's Ink It Up - Anything Goes

Hi everyone and happy Saturday :-)

It's still the 14th here in Germany but it's the 15th in Australia already and that means a new challenge is up and running for the month of January at Let's Ink It Up :-)

We start the new year not only with a new blog design but also with a challenge everyone loves:
Anything Goes

We also have an amazing prize for one lucky winner: 
A Scor-Buddy and Mat sponsored by Scor Pal 

Here's my project I did for the challenge:
  • stamp - Whimsy Stamps 'Everyday Circle Postmarks' by Raindrop Echo Designs
  • patterned papers - Authentique 'Gathering' 6x6 paper pad
  • tools - Big Shot, Corner Chomper
  • dies - Spellbinders 'Picot Edge Circles' and 'Classic Circles Large'
  • other supplies - Bazzill kraft cardstock,  Kaisercraft orange rhinestones, Sew Sweet orange crinkled seam binding, May Arts natural button twine, Sakura white gel pen, Distress Walnut Stain inks, paper piecing tool from stash, foam tape from stash
challenges:


~°~ Thanks for visiting my blog ~°~
Sylvia

Joy

 Hi everyone and happy Monday :-)

Today I want to show you this holiday tag I made using some digi kits from Hero Arts. I hope you like it :-)

tag recipe:
  • stamps, paper and tag - all Hero Arts digi kits: Hero Arts: Holiday Prints and Holiday Swirls
  • tools - mini sewing machine
  • other supplies - blue gingham ribbon, Making Memories mini staples, Kaisercraft blue rhinestones
~°~ Thanks for visiting my blog ~°~
Sylvia

{DT} - Whimsy Stamps Mini Blog Hop - Day 2

Hi everyone, happy Friday and welcome to Day 2 of our October Rubber Die Release Showcase :-)

On Wednesday (12 October), Whimsy Stamps released this month's rubber designs and new shapeology dies. From then until 19 October the Whimsy Stamps DT and Special Guests are showcasing these fabulous new stamps and dies with a daily mini blog hop.

Each mini blog hop has a new release prize hidden somewhere along the way and you have 24hrs to enter each prize draw.

To be entered into today's mini blog hop prize draw, be sure to leave a comment on ALL of the DT's posts listed below by 12.00 PM EST tomorrow. All winners will be announced on the Whimsy Inspirations blog after 12.00 PM EST on 19 October.

And here is my creation using one of Crissy Armstrongs new rubber stamps called 'Jolly Little Santa' and also some of the great 'Holiday Mini Postage Stamps' by Raindrop Echo Designs:

  
I put on lots of Stickles glitter on this tag (on the trees and postage stamps and I colored all the whites on Santas clothes with the shimmery Twinklings H2O but unfortunately it doesn't show very well in the picture)
  Jolly Little Santa was stamped, colored, cut out and put on foam tape. The Mini Postage Stamps where cut out using the matching shapeologie die. I distressed the manila tag with some Disress inks and stamped Lavish Flourishes all around the edges to achieve some extra texture.


Here is a full list of the wonderful new rubber stamps and dies that have been released on Tuesday
4 Crissy Armstrong rubber stamps
Bart Loves Christmas ~ Christmas Dreaming ~ Jolly Little Santa ~ Little Santa Claws


4 Kenny K rubber stamps
Drama Queen ~ Lady Victoria ~ Mistletoe ~ Mrs Claus


7 Raindrop Echo Designs rubber stamp sets
Holiday Mini Postage Stamps ~ Holiday Pennants ~ Postcard to Santa ~ Seasonal Ornaments (compatible die available) ~ Stockings (compatible die available) ~ Advent Calendar ~ Holiday Postage Stamps


2 Raindrop Echo Designs Shapeology dies
Stockings Dies ~ Ornaments Dies


Finally, I would like to let you know that issue #4 of the Whimsy Stamps Inspirations Magazine will be released on 19 October! Woo-hoo! It's a FULL issue packed with never-before-seen creations from the Whimsy Stamps DT and guest designers, so be sure to check it out for lots of gorgeous inspiration!


 To take a peek at the other today's fabulous new release creations by Design Team, please click on the links below (our mini blog hop for today):

Alberto Gava (guest)
 

Thanks for stopping by and don't forget to check the Whimsy Inspirations blog tomorrow for more new release creations!


card recipe:


  ~°~ Thanks for visiting my blog ~°~
Sylvia