Showing posts with label Hero Arts. Show all posts

AIR Project: Halloween Shaker Card


Hi everyone and happy Monday :)

I hope you enjoyed the weekend and had a great start into the new week!

Today it's my turn again to create a card for and post on the Imagine Crafts blog, again :)
Some of the AIRs (like me) were asked to create a Halloween card. Oh *yes* please!
Because, even though we don't celebrate Halloween like my friends in the US do, here in Germany, I am hooked by all things Halloween! I just love this time of year and love creating Halloween cards and other projects :)
Therefore I decided to create a shaker card... and I hope you like it (and I hope the step-by-step instructions incl. pictures over on the Imagine Crafts blog are understandable and helpful)
I would love to hear from you, whether you liked and understood the instruction or have more questions?


Thanks so much for stopping by today and I hope to see you here on my blog again, soon :)

Sylvia xx


Birthday Card "Best Wishes" Emboss Resist Meets Ombre


Hi everyone and happy Saturday :)

I have another Birthday card to share with you :)

No patterned paper this time, but only white cardstock, inks, stamps (and a die cut)!

For the card base I used a large background stamp from Hero Arts and stamped it with Versamark ink onto white cardstock. After embossing it with IMAGINE Crafts Iridescent embossing powder, I have used Ink Blushers to pick up some Lilac Posies Memento and Teal Zeal Memento inks and created an ombré background. The clear (iridscent) embossed background acts like a resist and so the loops look like stamped/embossed in white. I just love this effect - even more with that pretty subtle shine of the embossing powder!

And because I really wanted this pretty background be the "star of the show", I only used a sentiment (from CAS-ual Fridays Stamps) and stamped it with Lilac Posies Memento inks onto a die cut Bubbles Lable and mounted it onto the card with foam tape.

I tried to catch the lovely sparkle of the iridescent embossing powder in a picture, but it was really really difficult (because it is a very subtle shimmery shine)


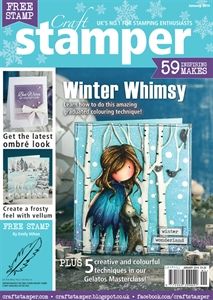
BTW: I have a detailed step-by-step tutorial (incl. pictures) in the current Craft Stamper magazine where I show you how to create an ombré background like this (without the embossing resist). So if you find a copy of the January Craft Stamper somewhere in your craft store, you may want to pick it up (or just order it online ;-) ) and have a closer look on how to do it :-)


ETA: I have taken an additional picture in the evening - with bulb lights to catch the lovely shimmer! 
Please accept my apologies for the bad overall picture quality and that it is so blurry (I didn't have a tripod on hand) BUT at least you can see a little bit of the adorable shimmer and shine of the IMAGINE Crafts iridiscent embossing powder (especially in the upper half of the card), here in this blurry picture ;)


Thank you so much for stopping by today! I hope to see you visiting my blog, again, soon!


    Supplies


Christmas Card for CAS-ual Fridays #121


Hi everyone and happy Friday :)
Hallo zusammen und Euch allen einen wunderschönen Freitag :)
It's time for the next challenge at CAS-ual Fridays *woohoo* And our challenge for you for the next two weeks is
Es ist schon wieder Zeit für die nächste Herausforderung bei CAS-ual Fridays *juhu* Und unsere Challenge für die kommenden zwei Wochen lautet


to create a clean and simple card or project with EIGHT of *whatever* ;) In my sample card I used a string with eight Christmas baubles on it. You could also use eight sequins, eight words .... you name it.

eine clean and simple Karte/Projekt mit ACHT von *was auch immer* ;) zu gestaltetn. Auf meiner Beispielkarte habe ich eine Kette mit acht Weihnachtskugeln verwendet. Ihr könntet aber auch einfach acht Pailletten auf die Karte kleben, acht Wörter benutzen... naja, ich denke Ihr habt die Idee sicherlich verstanden.
This weeks sponsor is
Der Sponsor für diese Woche ist


I have used a sentiment from the CAS-ual Fridays Stamps "Christmas Carols" set and stamped it with a lovely pearlescent green Brilliance ink. I added the die cut Christmas ornament string to the card. I have used a Xyron sticker maker to adhere it to the card. The larger star is from a Woodware stamp set and this set was the featured stamp set in the December issue of Craft Stamper where I was lucky enough to get one of those sets and create two cards for the magazine :-)
The smaller stars are from an older Hero Arts stamp set. All stars were stamped with Galaxy Gold Brilliance inks. 

Ich habe einen Spruch aus dem "Christmas Carols" Set von CAS-ual Fridays Stamps benutzt und ihn mit einem wunderschön schimmernden grünen Pearlescent Brilliance Kissen gestempelt. Dann habe ich die ausgestanzte Weihnachtskugelbordüre auf die Karte geklebt (dafür habe ich einen Xyron Sticker Maker benutzt). Der größere Stern ist übrigens aus einem Set von Woodware, das in der aktuellen Ausgabe des Craft Stamper Magazins vorgestellt wurde. Ich hatte die Ehre dieses Set zu erhalten und damit auch zwei Karten für das Magazin zu gestalten :-) Die kleinen Sternchen stammen aus einem älteren Hero Arts Set. Alle Sterne wurden mit Galaxy Gold Brilliance Stempelfarbe gestempelt.
For more inspiration from the talented Girl Fridays, please visit the CAS-ual Fridays blog!
Für weitere Inspiration von all den talentierten "Girl Fridays", besucht doch den CAS-ual Fridays Blog!

ETA:
*** Thank You ***


    Supplies


    Challenges
  • CAS-ual Fridays #121 (Create With 8)

Zva Creative October DT Blog Hop!

Zva Creative and my fellow Design Team members welcome you to our October blog hop. This month we are celebrating fall and Halloween and are excited to be sharing our new work with you! Thanks so much for joining us!
Today's Blog Hop begins at Zva Creative's Facebook page. Be sure head on over to check it out! 
Here's a list of participants (in case there is a glitch along the way):

As you know, Zva offers many beautiful color groupings for pearls, flowers and crystals.  If you like what you see along the hop you can find a list of stores and online retailers that sell Zva HERE.

As mentioned above, this months hop is all about Fall and/or Halloween :)
We do not celebrate Halloween here in Germany, but I can't help but love the "mood" of this special holiday :) I love to create and send out Halloween greeting cards and therefore I have this Halloween card to share with you.
I just love how easy it is to create a really special card without having much work involved if you use the gorgeous Zva Creative bling! In this case I have used the Flourish Jet Crystal (CRB-06CA-128) and cut it apart into two pieces and used one swirl above and the other one below the focal point. A seam binding tied into a bow and the card is finished. Love the result and I hope you love it, too!
Oh and I have another Halloween project I want to share with you, in case you haven't seen it yet.
It is not new, but I thought you would be interested in it, too.
I have created this little Halloween treatbox using the rhinestone swirl embellishment from Zva Creative (CRB-03CA-107) 


You can find all details (incl. template for the box and a short video instruction) 


And I think these two also go wonderful together:

If you would like to play along with our design team, just follow along the blog path.  I am linking to one of the Zva designers and that designer is linking to the next and so on. Be prepared to be inspired along the way!
The Blog Hop starts today, October 28th and runs through midnight US Eastern Standard Time on Tuesday, October 29th.
***Prizes***
Hidden on FIVE of the designer's blogs is a Zva Creative prize package! Winners will be randomly chosen after the hop is over. All you need to do is leave a comment on this Blog Hop post... you do not need to leave a comment on each and every designer's blog post to qualify. However, the more times you comment along the blog hop path, the more chances you will have to win.

The 5 winners will be announced on Wednesday, October 30th on Zva Creative's Facebook page!
We also thought it would be more fun to add even more chances to win our blog hop prize!  To increase your chances of winning:
* Comment to let us know that you posted on your Facebook page about our hop (link to any of the blog hop posts)
* Comment to let us know that you "tweeted" about our hop (link to any of the blog hop posts)
* Comment to let us know that you asked your local store to carry Zva creative products.  If they already do, that's fantastic, maybe you can suggest other products that they don't carry.

The blog hop begins here at Zva Creative's Facebook page! Your next stop is Lisa Somerville. Enjoy!

Thank you for joining us!

    Supplies


Best Wishes On Your Birthday


Hi everyone and happy Saturday :) 
Today I have a super simple card to share. I've made this for this weeks "sketch challenge" at Splitcoaststampers where Korin Sutherland provided a great (clean, simple, versatile) sketch to play with :)
Just hop on over to the forums to see the sketch - and the entries. And maybe you want to play along? That would be great! :)
I have used the larger one in the "Bubble Labels Fri-Dies" set and a sentiment from "Mums the Word" set by CAS-ual Fridays Stamps, Hero Arts shadow inks (*love* these inks!), patterned papers from Carta Bella's "Hello Again" collection and some enamel dots. I've added some faux stitching to the patterned paper panel and put the sentiment label on foam pads.

Hallo zusammen und Euch allen einen wunderschönen Samstag :)
Heute zeige ich Euch mal wieder eine super einfache Karte. Die ist für die "Sketch Challenge" bei den Splitcoaststampers entstanden, wo Korin Sutherland einen wirklich tollen Sketch (clean, simple, und sehr variabel zu verwenden) bereit gestellt hat :)
Schaut doch einfach mal im Forum vorbei um den Sketch, sowie die Beiträge anzuschauen - und vielleicht macht Ihr ja auch einfach selbst mit? Das wäre echt klasse! :)
Ich habe hier die größere Stanze aus dem "Bubble Lables Fri-Dies" Set, sowie einen Spruch aus dem "Mums the Word" Set von CAS-ual Fridays Stamps, Hero Arts Shadow Stempelkissen (ich *liebe* diese Stempelfarben!), gemustertes Papier aus der "Hello Again" Serie von Carta Bella, sowie ein paar Enamel Dots verwendet. Rund um das gemusterte Papier noch falsche Nähte gemacht und das gestanzte Label auf 3D Pads gesetzt und das war's auch schon.


Edited to add
*** Thank You ***
(post #26)


    Supplies


~°~ Thanks for visiting my blog ~°~
Sylvia

Thank You Thank You Thank You


Hi everyone and happy Thursday :)
I have another card for the Moxie Fab World Tuesday Trigger!
I was -again- inspired by the gradient (ombre) effect on the cake and also went for the white stripes between the colors. Like last time I just *had to* add a butterfly (because I love that cute butterfly on top of that cake ;-) )
All stamps on this card are from the "Big Thanks" set by CAS-ual Fridays Stamps

Hallo zusammen und Euch allen einen wunderschönen Donnerstag :)
Ich hab' noch eine weitere Karte für Moxie Fab World Tuesday Trigger!
Und wieder hat mich der Farbverlauf (Ombre Effekt) der Torte inspiriert und ich habe dieses Mal auch die weißen Streifen zwischen den einzelnen Farben übernommen. Wie auch schon beim letzten Mal *musste* ich auch hier wieder einen Schmetterling mit ins Spiel bringen (denn mir gefällt der Schmetterling oben auf der Torte so gut ;-) )
Alle Stempel auf der Karte sind vom "Big Thanks" Set von CAS-ual Fridays Stamps

Tuesday Trigger:

    Supplies
  • stamps - CAS-ual Fridays Stamps "Big Thanks"
  • inks - Hero Arts inks: "Butter Bar", "Pale Tomato", "Fresh Peach", "Soft Apricot"; Versafine "Onyx Black"
  • others - white cardstock, butterfly punch, dimensional foam adhesive

    Challenges


~°~ Thanks for visiting my blog ~°~
Sylvia

Start Where You Are...


Hi everyone and happy Tuesday :)
Today I am sharing an encouragement card with you that you could send to a woman but also to a man. I think this card is quiet "neutral" because of the muted colors.
I stamped the wave in three different colors, then overstamped them in black with the sentiment from "Breathe" set. Besides mounting the stamped panel onto the beautiful piece of patterned paper from Carta Bella's "Hello Again" collection - that just was it! Super simple, yet I love the result and I hope you will like it, too :)

Hallo zusammen und Euch allen einen wunderschönen Dienstag :)
Heute möchte ich Euch eine Aufmunterungskarte zeigen, die man sowohl einer Frau als auch einem Mann schicken könnte. Ich finde durch die gedeckten Farben ist sie ziemlich "neutral".
Ich habe die Wellen in drei verschiedenen Farben übereinander gestempelt und danach dann den Spruch noch mit schwarz darüber gestempelt (alle Stempel aus dem "Breathe" Set). Neben dem Aufbringen des gestempelten Rechtecks auf ein wunderhübsches Stück gemusterten Papiers aus der Carta Bella "Hello Again" Serie - war's das auch schon! Wirklich ganz super einfach, aber mir gefällt das Ergebnis und ich hoffe Euch ebenfalls :)


ETA:
*** Thank you so much ***


    Supplies


~°~ Thanks for visiting my blog ~°~
Sylvia

Absolutely Ah-mazing

Hi everyone and happy Tuesday :)
Today I wanted to share a card with you that I made for the Birthday Sketch challenge over at Moxie Fab World! Unfortunately I did not read the rules very well *ahem* and only saw that the challenge entries have to be Birthday cards, when I finished my card *lol*
And while my sweet crafting friend Jocelyn Olsen told me she would send it out as a Birthday card ;-) I am not sure this card is eligible as an official entry for the challenge?
But either way, it doesn't hurt to show it here on my blog, does it? ;-)

Hallo zusammen und Euch allen einen wunderschönen Dienstag :)
Heute wollte ich Euch eigentlich eine Karte zeigen, die für die Geburtstags Sketch Challenge bei Moxie Fab World entstanden ist! Dummerweise habe ich die Regeln irgendwie nicht so richtig gelesen *räusper* und erst als ich mit meiner Karte fertig war, habe ich realisiert, dass es ja eine Geburtstagskarte hätte sein sollen *lol*
Und obwohl meine liebe Internet Stempel-Freundin Jocely Olsen meinte, das sie diese Karte durchaus auch zum Geburtstag verschenken würde ;-) bin ich nicht so ganz sicher, ob die Karte wirklich als Challenge Beitrag taugt? ;-)
Wie auch immer, es tut auch nicht weh wenn ich sie hier auf meinem Blog zeige, stimmts?! ;-)

This is the sketch I followed (provided for the challenge, which can be found here) - I rotated it 90°
Das ist der Sketch (von der Challenge, die ihr hier finden könnt) - ich habe ihn allerdings um 90° gedreht


close up / Detailaufnahme:

card recipe:
  • stamps - CAS-ual Fridays Stamps "Exclamations" + "Amazeballs"
  • tools - We R Memory Keepers Corner Chomper
  • inks - Versafine "Onyx Black", Hero Arts "Butter Bar" + "Bubble Gum"
  • others - white cardstock, clear rhinestones, dimensional foam adhesive

Follow me:
follow me on bloglovin' get updates via email
 
~°~ Thanks for visiting my blog ~°~
Sylvia

I'm a Guest Blogger on Lisa Rukin Swift's Blog

Hi everyone! I am thrilled that I was invited to write an article about stamping, on Lisa Rukin Swift's blog! Thank you so much for the invitation, Lisa!

And here's the post you can also find on Lisa's blog today :)
 
If you know me, you know that I love pretty designer papers! But I also am a passionated stamper for a long time! I just LOVE stamping :)
 
So I thought for this special "stamping" feature, I will make a card without any patterned papers!
*gasp* ;-)

What do you think? Are you ready?
Ok, let's start:
 

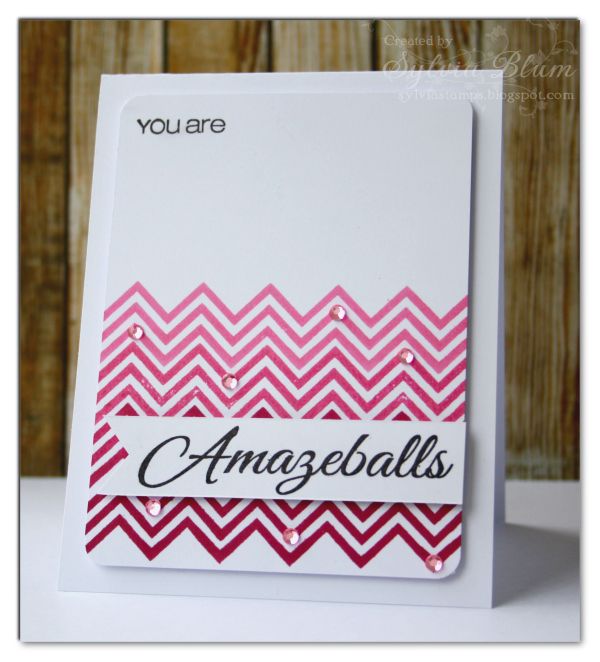
We are going to make the above shown card and create an "ombre" effect by using one background stamp and two inkpads!

I will show you how I did this and also share some general tips that I think are helpful to know when you are stamping.
 
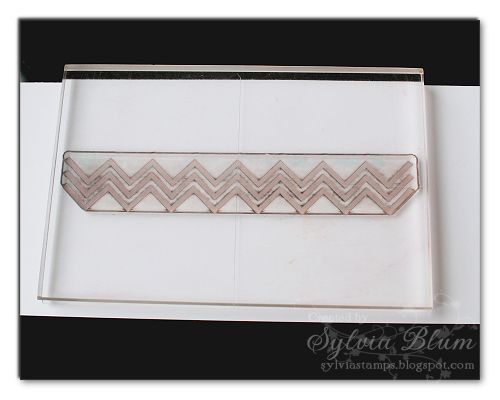
Here's tip #1 for using large clear stamps with acrylic blocks:
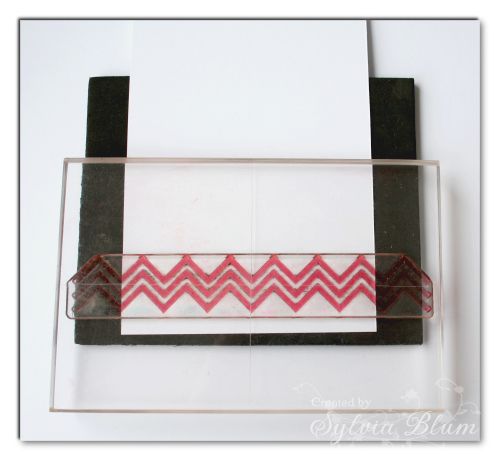
Instead of adhering the stamp onto an acrylic block, lay the stamp down onto the table (face down!) and make sure it lies straight. Then press down the acrylic block onto the back side of the clear stamp - as shown in the picture below.
This way you make sure to have your stamp attached straight to the block. If you do it the other way (press stamp onto acrylic block) it sometimes happens that the stamp is not straight on the block but is attached buckled or wavy. 
 
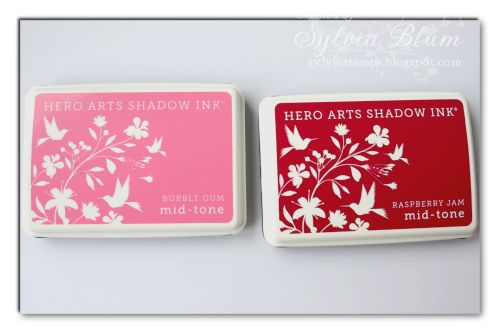
To create the ombre background I used these two inkpads:
 
Hero Arts "Bubble Gum" is a light pink color and "Raspberry Jam" is a very rich and dark pink color.
 
Before we start to create the ombre chevron pattern I want to share a second tip with you:
When stamping with a clear stamp, always put a soft and elastic pad (like a pc mouse pad) underneath your paper. This helps you to get a better and more crisp impression:
 
Now onto the ombre effect:
 
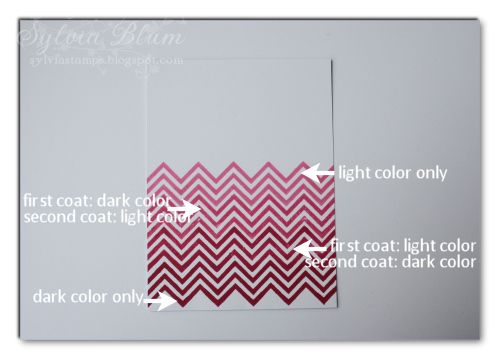
1. Ink the chevron stamp using the dark color and stamp it on the bottom of the white cardstock. Clean the stamp!
 
2. Ink the chevron stamp using the light color, then lightly dab the dark inkpad over it. Stamp above the first line of stamped chevron pattern. Clean the stamp!
 
3. Ink the chevron stamp using the dark color, then lightly dab the light inkpad over it (don't worry, the light colored inkpad will not be ruined! I am using this technique very often and never had any problems with my inkpads). Stamp above the second chevron line. Clean the stamp!
 
4. Ink the chevron stamp using the light color and stamp it above the third chevron line.
Isn't that easy?
 
I rounded all four corners of the stamped panel using the 1/4" corner of the Corner Chomper tool.
Afterwards I stamped "You are" with black ink in the left upper corner of the same panel and then I attached the panel to a slightly larger white cardbase using dimensional foam adhesive.
 
Stamp "Amazeballs" onto a strip of white cardstock using black ink and cut the left end of the strip so it looks like a little flag. Adhere to card using dimensional foam adhesive, again.
Now a little bling for some additional interest - and your stamped ombre card is finished!
 
Here's the finished card:
 
 
I hope you enjoyed this little article about stamping and maybe you learned something new and feel inspired to get your stamps out and have some FUN :)
 
Once again: Thanks so much for having me as a guest on your blog, Lisa!
 
Sylvia
 

***Thank you***
(see first post)

 
card recipe:
  • stamps - Paper Smooches "Geo-graphic" (chevron); CAS-ual Fridays Stamps "Amazeballs" (words)
  • inks - Hero Arts "Bubble Gum" + "Raspberry Jam"; Versafine "Onyx Black"
  • others - white cardstock, We R Memory Keepers "Corner Chomper", pink rhinestones, dimensional foam adhesive