Showing posts with label GDT. Show all posts

Whimsy Stamps *NEW* Clear Stamps Release Day Blog Hop


Hi everyone and happy Wednesday :)


Welcome to the Clearly Whimsy Stamps release BLOG HOP! If you stopped by over the past couple of days, you would have read the announcement that Whimsy Stamps have added a whole new line and style to their existing product range ...
Photopolymer Clear Stamps
The brand new debut release of photopolymer clear stamps and coordinating shapeology dies are now available to buy from the Whimsy Stamps store

 To celebrate this new release, we are holding a new release blog hop today. We have hidden TWO prizes of 2 new release clear stamp sets and 1 matching die somewhere along the hop. To be entered into the draw, simply leave a comment on every stop along the hop! You have until Sunday March 14th at 12.00PM EST to leave comments and the lucky winners will be announced on the Whimsy blog on Monday (March 15th). 

For my sample card below, I have used the "Feeling Fruity" stamp set and the "Fruit Trio"  die set!

Please refer to the grey boxes below this post for step-by-step instructions and a complete list of supplies :)


You should have hopped here from WHIMSY STAMPS' blog. Your next stop on the hop is DENISE LYNN.  

Finally, here is a complete blog hop list in hopping order:

For a full reveal of the new release, be sure to stop by the Whimsy blog.


Thanks so much for stopping by today and I hope to see you here on my blog again, soon :)

Sylvia xx


    Instructions
  • create top folded 5 1/2" x 4 1/4" card blank from 5 1/2" x 8 1/2" white cardstock
  • cut 5 1/4" x 4" rectangle from green patterned paper and adhere to card front
  • cut 5" x 3 3/4" rectangle from white cardstock
  • stamp "Thank you ___ much" ("Feeling Fruity" stamp set) with Memento Tuxedo Black into lower right corner of the white panel
  • stamp "berry" ("Feeling Fruity" stamp set) with Memento Pear Tart below black stamped part of sentiment (refer to picture for placement)
  • die cut strawberries twice from red patterned paper; die cut stem twice from green patterned paper ("Feeling Fruity Dies" set); mount pieces together to form two strawberries and adhere to card front
  • mount white panel with foam tape to card front

    Supplies


Whimsy Stamps *NEW* Clear Stamps Sneak Peek Day 1


 This is my second post for today! You can find the CAS-ual Fridays Stamps sneak peek post here - or just scroll down to the next post!


Hi everyone and happy Monday - again (because this is my second post, today)  :)

If you stopped by the Whimsy Stamps blog today, you would have read the announcement that they have added a whole new line and style to their existing product range:

Photopolymer Clear Stamps

Whimsy Stamps has put together a DREAM TEAM of crafters to help them launch their debut clear release, and I am thrilled to be part of that team. Myself and the rest of the team will be sharing some fabulous sneak peeks of the first release of this new clear line over the next 2 days in the lead up to their release on Wednesday 12th March.Then on Wednesday, we will be holding a fantastic BLOG HOP to celebrate the new release where 2 lucky hoppers will win 2 amazing prizes! Today we are holding a sneak peek hop, and if you hop along with us and leave a comment at every stop along the way, you will be entered into the draw to win a $15 GIFT CERTIFICATE to spend at the Whimsy Store

 Here is today's hop list:
Amy Kolling 
Deb Routledge 
Jen Nelson 
Simonne Clay 
Donna Mikasa (GDT) 
Heather Pulvirenti (GDT) 
Maureen Merritt (GDT) 
Michelle Short (GDT) 
Rosemary Dennis (GDT) 
Sylvia Blum (GDT) - that's me :-D


Please refer to the grey boxes below this post for step-by-step instructions and a complete list of supplies :)


Don't forget to check the Whimsy blog tomorrow for more sneak peeks!


Thanks so much for stopping by today and I hope to see you again here on my blog, very soon. Because I will have another TWO posts for you, tomorrow :-D

Sylvia xx


    Instructions
  • create top folded 4 1/4" x 5 1/2" card blank from 4 1/4" x 11" white cardstock and round lower corners
  • stamp dashed circle ("Feeling Fruity" set) with Memento Pear Tart onto card front
  • stamp pear twice onto green patterned paper and let the pears slightly overlap
  • cut out trimming closely and adere to card front using foam pads
  • stamp "We make a perfect" ("Feeling Fruity" set) with Versamagic Jumbo Java onto 4 1/4" x 3/8" strip of white cardstock
  • stamp "pear" ("Feeling Fruity" set) with Memento Pear Tart onto the same strip
  • mount to card front using foam pads
  • embellish with red enamel dots

    Supplies

Guest Designer for SCS CAS Challenge: Thank You Card


Hi everyone and happy Monday :)

I am very excited today, because I was asked by the lovely Jen (aka Miss Boo) at Splitcoaststampers to be a guest designer for this weeks "Clean and Simple Cards Challenge".
Well of course I said "yessssssss please" *lol*

The current challenge is a "stair-step sketch" challenge with a given card to use as inspiration. When I began gathering my supplies and started to create, it was NOT my intention to copy the card.... seriously!!!

But in the end... my card was a total CASE of the given card  (see the challenge thread for the inspirational card) .... oh well! *lol*


I hope you will stop by at Splitcoaststampers and participate in the challenge!
I would be really delighted to see you playing along and uploading your card to the SCS gallery! :)

You can find all details about the challenge ***HERE***

Please refer to the grey boxes below this post for step-by-step instructions and a complete list of supplies :)

Thanks so much for stopping by today and I hope to see you here on my blog again, soon :)

Sylvia xx


    Instructions

    Supplies

    Challenges


Zva Creative December DT Blog Hop!

Hi everyone and happy Monday :)

Happy holidays to you! Zva Creative and the talented new 2014 Design Team welcome you to our December blog hop where we officially welcome many of our new team members to our monthly hops! We are very excited about this year’s team and are sure that you will be inspired by and love their work. Are you ready to hop along and get to know them better?

And as a bonus— today’s hop is EXTRA special because you will get a sneak peek of Zva’s newest products which are set to be released at the next CHA tradeshow!

The hop begins at Zva Creative’s blogBe sure head on over to check it out! You will also find a complete list of all the participating blogs there (in case there is a glitch along the way). 

As you know, Zva offers many beautiful color groupings for pearls, flowers and crystals.  If you like what you see along the hop you can find a list of stores and online retailers that sell Zva HERE.


After having finished a LOT of Christmas cards during the last weeks, I just wanted to do something totally different :-D Therefore I created this Birthday card in bright colors and with lots of flowers :-)
I cut strips of various patterned papers (Fancy Pants) and adhered them to the bottom of the top folded card. I stamped a simple Birthday sentiment (Whimsy Stamps) with Memento "London Fog" (to match the grey colors from the patterned papers) and wrapped a length of twine around the card and tied it into a bow.
And -of course- I used one of the adorable "Clear Florishes" stickers from Zva Creative to finish my card! :-)  This sticker is not from the brand new collection but it is still gorgeous, isn't it?! :)

If you would like to play along with our design team, just follow along the blog path.  I am linking to one of the Zva designers and that designer is linking to the next and so on. Be prepared to be inspired along the way!
The Blog Hop starts today, December 30th and runs through midnight US Eastern Standard Time on Tuesday, December 31st.
***Prizes***
Hidden on FIVE of the designer’s blogs is a Zva Creative prize package!Winners will be randomly chosen after the hop is over. All you need to do is leave a comment on this Blog Hop post... you do not need to leave a comment on each and every designer's blog post to qualify. However, the more times you comment along the blog hop path, the more chances you will have to win.

The 5 winners will be announced on Wednesday, January 1st on Zva Creative’s blog.We will do our best to notify each winner, but it's best if you can pop in to Zva’s blog on Wednesday to see if you are a winner!

We also thought it would be more fun to add even more chances to win our blog hop prize!  To increase your chances of winning:
* Comment to let us know that you posted on your Facebook page about our hop (link to any of the blog hop posts)
* Comment to let us know that you "tweeted" about our hop (link to any of the blog hop posts)
* Comment to let us know that you asked your local store to carry Zva creative products.  If they already do, that's fantastic, maybe you can suggest other products that they don't carry.
*Hop over to Zva’s facebook page and “like” our page or leave a comment there to tell us that you stopped by if you already like follow us there!

The blog hop begins at Zva Creative’s blog and your next stop is Windy Robinson. Enjoy!

Thank you for joining us!

P.S. Mark your calendar to join the Zva Creative DT again on January 27th for their next Zva blog hop!


    Supplies


Zva Creative October DT Blog Hop!

Zva Creative and my fellow Design Team members welcome you to our October blog hop. This month we are celebrating fall and Halloween and are excited to be sharing our new work with you! Thanks so much for joining us!
Today's Blog Hop begins at Zva Creative's Facebook page. Be sure head on over to check it out! 
Here's a list of participants (in case there is a glitch along the way):

As you know, Zva offers many beautiful color groupings for pearls, flowers and crystals.  If you like what you see along the hop you can find a list of stores and online retailers that sell Zva HERE.

As mentioned above, this months hop is all about Fall and/or Halloween :)
We do not celebrate Halloween here in Germany, but I can't help but love the "mood" of this special holiday :) I love to create and send out Halloween greeting cards and therefore I have this Halloween card to share with you.
I just love how easy it is to create a really special card without having much work involved if you use the gorgeous Zva Creative bling! In this case I have used the Flourish Jet Crystal (CRB-06CA-128) and cut it apart into two pieces and used one swirl above and the other one below the focal point. A seam binding tied into a bow and the card is finished. Love the result and I hope you love it, too!
Oh and I have another Halloween project I want to share with you, in case you haven't seen it yet.
It is not new, but I thought you would be interested in it, too.
I have created this little Halloween treatbox using the rhinestone swirl embellishment from Zva Creative (CRB-03CA-107) 


You can find all details (incl. template for the box and a short video instruction) 


And I think these two also go wonderful together:

If you would like to play along with our design team, just follow along the blog path.  I am linking to one of the Zva designers and that designer is linking to the next and so on. Be prepared to be inspired along the way!
The Blog Hop starts today, October 28th and runs through midnight US Eastern Standard Time on Tuesday, October 29th.
***Prizes***
Hidden on FIVE of the designer's blogs is a Zva Creative prize package! Winners will be randomly chosen after the hop is over. All you need to do is leave a comment on this Blog Hop post... you do not need to leave a comment on each and every designer's blog post to qualify. However, the more times you comment along the blog hop path, the more chances you will have to win.

The 5 winners will be announced on Wednesday, October 30th on Zva Creative's Facebook page!
We also thought it would be more fun to add even more chances to win our blog hop prize!  To increase your chances of winning:
* Comment to let us know that you posted on your Facebook page about our hop (link to any of the blog hop posts)
* Comment to let us know that you "tweeted" about our hop (link to any of the blog hop posts)
* Comment to let us know that you asked your local store to carry Zva creative products.  If they already do, that's fantastic, maybe you can suggest other products that they don't carry.

The blog hop begins here at Zva Creative's Facebook page! Your next stop is Lisa Somerville. Enjoy!

Thank you for joining us!

    Supplies


Fusion Challenge #2

Hi everyone and happy Friday - again :)
 Hallo zusammen und Euch allen -noch einmal- einen wunderschönen Freitag :)

*****
If you are looking for my CAS-ual Fridays card, please scroll down to the next post!  
Falls Ihr nach meiner Karte für CAS-ual Fridays sucht, scrollt bitte runter zum nächsten Posting!
*****

I am here with a second post today, because I was asked to be a guest designer for the new "Fusion" challenge blog. The idea behind this is that you have two inspirations: one is a sketch and the second one is an inspirational picture! You can participate by using either one one of the inspirations or just use both and make a FUSION ;-)

Ich bin heute mit einem zweiten Posting hier, weil ich gefragt wurde, ob ich als Gastdesigner für die neue "Fusion" Challenge fungieren möchte. Die Idee hinter dieser Challenge ist, das es zwei Inspirationen gibt: Die eine ist ein Sketch, die zweite ist ein Foto! Man kann mitmachen indem man einfach nur den Sketch benutzt, oder aber das Foto als Inspiration. Oder aber man lässt sich durch beides inspirieren - und macht quasi eine FUSION ;-)


Here are this weeks inspirations:
Das sind die Inspirationen für diese Woche:


I used Jackie's sketch and Lesley's inspirational picture and made this fusion card:
Ich habe sowohl Jackie's Sketch also auch Lesley's Foto als Inspiration genutzt und habe diese Fusion Karte gemacht:


*** Thank You ***
(see post #10)

card recipe:
challenges:
 
~°~ Thanks for visiting my blog ~°~

Sylvia

CASE Study GDT

   
Hi everyone and happy Thursday :)
It's the last day of February and so this is my last post as a guest for the CASE Study Challenge!
I really had a blast CASE-ing this months muse Teri Anderson!

I was inspired by the color combo (grey/orange) and the speech bubble, Teri used on her card. I hope you'll find some time to play along with Teri, me and all the wonderful designers over at CASE Study Challenge :)
Teris card / Teris Karte:

Hallo zusammen und Euch allen einen wunderschönen Donnerstag :)
Heute ist der letzte Tag im Februar und somit ist es auch mein letzter Beitrag als Gast für die CASE Study Challenge!
Ich hatte wirklich sehr viel Spaß dabei all die schönen Werke der "Muse" dieses Monats zu CASEn: Teri Anderson!
Ich habe mich für meine Karte durch die Farbkombi (grau/orange), sowie die Sprechblase inspirieren lassen.
Ich hoffe Ihr findet Zeit und habt Lust mit Teri, mir und all den wunderbaren Designteam Mitgliedern in der Challenge dieser Woche bei CASE Study mitzumachen :)

close up of my card
Detailaufnahme meiner Karte:


card recipe:


*** patterned papers and stickers are content of Scrapbook Werkstatts March Kit ***
*** gemusterte Papiere und Sticker sind im März Kit der Scrapbook Werkstatt enthalten ***

challenges:
~°~ Thanks for visiting my blog ~°~
Sylvia

CASE Study GDT


Hi everyone and happy Thursday :)
Today I'm so thrilled to tell you that I have been asked to serve as a guest designer for CASE Study this month! Even more because this months muse is the super talented
Teri Anderson
 
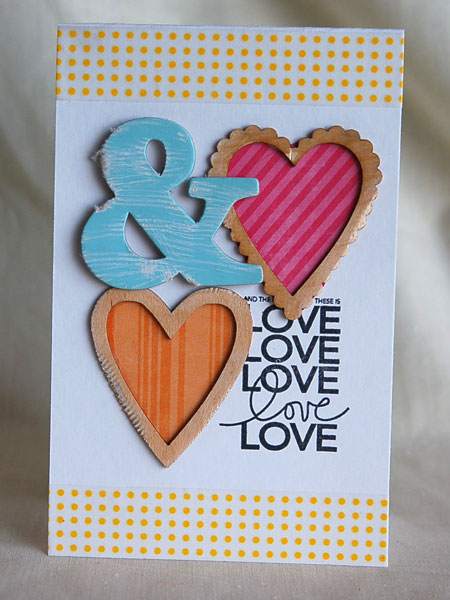
My card was inspired by the Washi tape Teri put on top and bottom of her card (at least I *think* this is Washi?!), the bright and happy colors, the huge and prominent ampersand and the love theme

This is Teris card we are CASE-ing this week
Das ist Teris Karte, die diese Woche ge-CASE-d wird:

Hallo zusammen und Euch allen einen wunderschönen Donnerstag :)
Heute bin ich ganz außer mir vor Freude Euch erzählen zu dürfen, das ich gefragt wurde ob ich diesen Monat als Gast Designerin bei CASE Study fungieren möchte! Und umso mehr, als die Muse diesen Monats auch noch eine ganz besonders talentierte Kartenmacherin ist:
Teri Anderson

Ich habe mich inspirieren lassen durch das Washi Tape, das Teri oben und unten auf Ihre Karte geklebt hat (naja, zumindest *glaube* ich, das es Washi ist?!), die hellen und fröhlichen Farben, das große und auffällige kaufmännische Und-Zeichen, sowie das Thema Liebe

card recipe:
  • stamps - Paper Smooches "We Connect"
  • tools - We R Memory Keepers "Corner Chomper"
  • others- white cardstock, mt various Washi tapes, clear, blue, pink rhinestones, Versafine ink "Black Onyx"
challenges:
 
~°~ Thanks for visiting my blog ~°~
Sylvia

O Holy Night - Fussy and Fancy GDT


Hi everyone and happy Friday :)
Today I'm sharing another tag with you - I just **love** making tags, recently - and I hope you are not tired of seeing them ;-)  This tag was made for my guest DT gig at Fussy and Fancy Challenge and this fortnight challenge is to create something to show "I Love Christmas" (and I definitely do!) - thanks so much for having me!!!

 Ok, now some details about the tag and how I've done it:
The tag itself is cut from a light Bo Bunny "Rejoice" paper. I've distressed the edges using a distressing tool, some Distress Stain in "picket fence" and Distress inks in Walnut Stain.
After it was dry, I went over the edges with some Glitter Glam "Chandelier" (clear with iridescent glitter particles in it)

Then I die cut some pieces of plain light cardstock using the Venetian Motifs and the Venetian Accents sets from Spellbinders Paper Arts. I wiped the Walnut Stain distress inkpad right over the cut out pieces and added some drops of red Sprinklers from October Afternoon to the flourish die.. just a teeny tiny little bit
After everything was dry, I also added the Glitter Glam to the die cuts! This helps to make them a bit more sturdy and gives a nice shimmer and texture, too.

Then I stamped the beautiful "O Holy Night" sentiment image (from Whimsy Stamps "Holiday Carols Notables 4" set) to another piece of the light Bo Bunny Rejoice paper, then cut it out with my scissors.
Then I cut out some red Bo Bunny paper with the "Notables 4 Die" and some green Bo Bunny paper with the "Holly Branch Notables 4 Die", mounted everything by using adhesive tape and dimensional foam tape!
Adhered some satin and crinkled ribbon... finished!

Looks (and maybe reads) more complicated than it really was ;-)

Hallo zusammen und Euch allen einen wunderschönen Freitag :)
Heute zeige ich Euch mal wieder ein Tag - ich **liebe** Tags in letzter Zeit wirklich sehr - und ich hoffe Ihr seid es nicht bereits müde, die zu sehen ;-) Das Tag habe ich für meinen Gast-DT Auftritt (oder wie sagt man das auf deutsch? *lol*) bei Fussy and Fancy Challenge gestaltet. Das Thema der Challenge, die heute beginnt und zwei Wochen läuft ist "I Love Christmas" (was ich definitiv tue) - herzlichen Dank, das ich bei Euch Gast sein darf!

Ok, jetzt ein paar Details zu dem Tag und wie ich es gestaltet habe:
Das Tag selbst habe ich aus einem hellen Bo Bunny "Rejoice" Papier zugeschnitten. Dann habe ich die Ränder distressed, indem ich ein Distressing Tool, Distress Stain "picket fence", sowie Distress Stempelfarbe in Walnut Stain benutzt habe. Nachdem das getrocknet war, bin ich noch großzügig mit Glitter Glam "Chandelier" rundum gegangen (das ist klar mit irisierenden Glitzer-Teilchen).

Dann habe ich noch ein paar Teile mit dem Venetian Motifs und dem Venetian Accents Set von Spellbinders Paper Arts aus hellem Cardstock ausgestanzt. Ich hab' die ausgestanzten Motive dann direkt mit dem Walnut Stain Distress Stempelkissen bearbeitet und habe außerdem noch ein mini-mini-bisschen rote Sprinklers von October Afternoon hinzugefügt beim Schnörkel.
Nachdem das alles getrocknet war, habe ich auch hier wiederum großzügig von dem Glitter Glam aufgetragen. Das macht die ausgestanzten Teile nicht nur stabiler, sondern gibt ihnen auch einen hübschen Glanz und auch noch etwas Textur!

Anschließend habe ich den hübschen "O Holy Night" Stempel (aus dem Whimsy Stamps "Holiday Carols Notables 4" Set) auf ein weiteres Stückchen von dem hellen Bo Bunny Rejoice Papier gestempelt und mit der Schere rundum ausgeschnitten.
Danach habe ich noch Teile aus rotem Bo Bunny Papier mit der "Notables 4 Die" Stanze und aus grünem Bo Bunny Papier mit der "Holly Branch Notables 4 Die" Stanze ausgestanzt und dann alles zusammen gesetzt - teilweise mit normalem doppelseitigem Klebeband, teilweise mit 3D Klebe Pads!
Noch ein Satinband und ein geknüddeltes Bändchen am Tag angebracht - und schon fertig!

Es sieht (und liest sich vielleicht auch) komplizierter aus, als es tatsächlich war ;-)


***thank you***
 (post #7)

tag recipe:
challenges:

~°~ Thanks for visiting my blog ~°~
Sylvia